The risks of ignoring seal wear go beyond a slow leak. Unchecked fluid loss leads to rod and bore surface damage, contaminated hydraulic circuits, and — in the worst cases — uncontrolled load drops. OSHA's accident records document at least one fatality caused by sudden mast descent after a hydraulic fitting failure, a stark reminder that a leaking cylinder isn't just a maintenance issue.
This guide covers how to read a forklift hydraulic cylinder seal replacement diagram, how to recognize the early signs of seal failure, how to perform a correct replacement, and how to choose the right seal kit for your specific cylinder.
Key Takeaways
- A seal replacement diagram is a cross-sectional view showing the exact position and orientation of every seal in the cylinder assembly.
- Key warning signs: oil weeping along the rod, slow or jerky lift response, and mast settling under load.
- Seal material (NBR, polyurethane, or PTFE) must match the cylinder's operating pressure, temperature, and fluid type. Wrong materials fail fast.
- Follow the sequence: depressurize, disassemble per diagram, clean, install seals in correct orientation, reassemble to torque spec, and test.
- Dimensional matching to bore, rod, and groove dimensions is non-negotiable — universal kits are a risk.
Understanding the Forklift Hydraulic Cylinder Seal Replacement Diagram
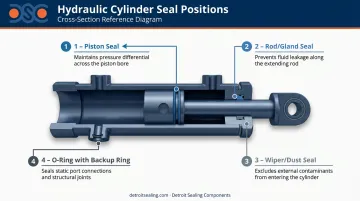
A seal replacement diagram is a labeled cross-sectional (often exploded) view of the cylinder assembly. It shows the exact position, quantity, and installation orientation of every seal, eliminating guesswork about which way a piston seal faces or whether a backup ring belongs inside or outside the O-ring groove.
Without the correct diagram for your specific model and serial number, you're working blind. Even a similar model from the same OEM can have different seal sizing or groove geometry.
Key Components Labeled in the Diagram
Piston seal — Seated in the piston groove, this seal prevents hydraulic fluid from bypassing the piston (internal leakage). Most diagrams include directional arrows indicating which face points toward the pressure side. Installing it backwards eliminates its sealing function.
Rod seal / gland seal — Located inside the gland (end cap), this seal stops fluid from escaping externally along the rod. Because it's a dynamic seal subject to continuous movement on every extension and retraction cycle, it typically wears faster than static seals.
Wiper seal / dust seal — Positioned at the outermost edge of the gland opening, the wiper scrapes contaminants (dirt, grit, moisture) off the rod on retraction before they reach the rod seal and bore. In outdoor or dusty environments, this is often the first seal to show wear.
O-rings and backup rings — O-rings handle static sealing at gland threads, end caps, and port connections. Backup rings sit adjacent to O-rings to prevent extrusion under high pressure. They're easy to overlook during reassembly, but skipping them in a high-pressure application will cause the O-ring to fail prematurely.
How to Read Your Specific Diagram
OEMs like Toyota, Yale, Hyster, Crown, and Komatsu publish model-specific seal diagrams in their service manuals. Using the wrong diagram, even for a closely related model, risks incorrect seal sizing or orientation. Once you've confirmed you have the right one, these are the details to focus on:
- Orientation arrows indicating which seal face is pressure-side
- "Pressure side" labels on or adjacent to each seal position
- Item numbers cross-referenced to the seal kit bill of materials (BOM)
- Groove dimension callouts (bore diameter, rod diameter, groove width) used to source or verify replacement seals
Always match the diagram to your model number and serial number before ordering parts.
Signs Your Forklift Hydraulic Cylinder Seals Need Replacing
Catching seal wear early is far cheaper than waiting until fluid loss is severe or the rod surface is damaged.
Visible Leaks and Fluid Loss
Oil weeping or streaking along the cylinder rod, fluid pooling beneath the mast assembly, or residue collecting around the gland face are the clearest external signs of a failing rod seal or wiper seal.
A subtler indicator: if you're frequently topping up the hydraulic reservoir without a clear external spill source, internal or rod seal bypass is likely. Even slow leaks invite contamination — Parker's Hydraulic Filtration Handbook attributes over 75% of hydraulic system failures to contamination, and a weeping seal is a direct entry point.
Performance Degradation
- Slow or jerky lifting despite correct fluid levels signals internal seal bypass — fluid is passing around the piston rather than building pressure, reducing effective lift force.
- Mast drift under neutral indicates piston seal failure — fluid is bleeding across the piston when the lever is at rest. OSHA 1910.178 requires removing any powered industrial truck in unsafe condition from service, and mast drift qualifies.
Physical and Visual Inspection Signs
- Rod surface scoring, pitting, or corrosion compromises the sealing surface. New seals installed on a damaged rod will fail quickly — the rod must be addressed first.
- Discoloration or crystallized residue on the gland face indicates long-standing leakage.
- Cloudy or milky hydraulic fluid signals water or air contamination — this condition degrades seals from within and requires immediate corrective maintenance.
How to Replace Forklift Hydraulic Cylinder Seals: Step-by-Step Guide
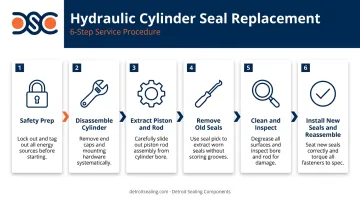
Safety Preparation
Before any work begins:
- Lower forks fully to the ground
- Depressurize the hydraulic system completely
- Lock out and tag out per OSHA 29 CFR 1910.147 — hydraulic stored energy can release without warning
- Support any raised components — do not rely on hydraulic cylinders to hold raised equipment
Tools needed:
- Appropriately sized gland wrench
- Plastic or nylon seal removal picks (no metal picks)
- Seal installation tool or thin plastic guide sleeve
- Lint-free rags
- Calibrated torque wrench
- Clean hydraulic fluid (for lubrication during installation)
- Vacuum bleeder (for post-reassembly air purging)
Disassembly
Removing the cylinder: Disconnect hydraulic hoses and cap the ends immediately to prevent contamination. Remove mounting hardware and use appropriate lifting equipment to detach and position the cylinder on a stable workbench. Reference the manufacturer diagram to identify the end-cap retention type (threaded, wire-retained, or circlip) before applying any force.
Extracting the piston and rod: Use a gland wrench to unthread or release the gland, then carefully slide out the piston rod assembly. Keep the rod aligned horizontally throughout — misalignment risks bending stress and bore wall scratches when the rod isn't properly supported.
Removing old seals: Use only plastic or nylon pry tools. Before removing each seal, photograph its orientation and cross-reference against the diagram and note which face was pressure-side and which faced atmosphere. This step prevents orientation errors during installation.
Installation
Cleaning and inspection: Wipe all internal surfaces (bore, rod, piston land, and gland) with an approved solvent. Avoid chlorinated-solvent cleaners on elastomeric seals; NBR seals are not resistant to chlorinated hydrocarbons.
Inspect every surface for scoring. Minor marks may be acceptable; anything deeper requires repair or component replacement before new seals go in.
Installing new seals: Lightly lubricate each new seal with clean hydraulic fluid. Install each seal in the exact orientation shown in the diagram, with the pressure-side arrow facing inward. Use a seal installation tool or thin plastic guide sleeve for internal groove seals. Twisting, nicking, or rolling a seal during installation is the most common error and often causes an immediate leak after reassembly.
Reassembly and Testing
- Lubricate the bore and use the protective sleeve method when reinserting the piston/rod assembly to avoid damaging seals over threaded ends
- Torque the gland to the manufacturer's specification — look this up in the service manual; do not estimate
- Reconnect hydraulic fittings securely and check port O-rings before pressurizing
Testing: Gradually pressurize the system and cycle the lift 4–5 times. Inspect the gland and rod for any weeping. If the lift feels spongy or inconsistent, bleed air from the system using a vacuum bleeder. Monitor the cylinder through a full first shift before returning to full-load duty.
Choosing the Right Replacement Seal Kit
Dimensional Matching
Seal kits must match the cylinder's bore diameter, rod diameter, and groove dimensions — not just the forklift brand. To confirm fit:
- Measure existing seals with digital calipers: OD, ID, and cross-section thickness
- Or cross-reference using the cylinder's service manual part number
Avoid "universal" kits that don't confirm exact dimensions. ISO 7425-1 and ISO 7425-2 govern piston and rod seal housing dimensions respectively, and OEM-specified seals are designed to those tolerances.
A seal that's a few thousandths off in groove width will either extrude under pressure or fail to seal entirely.
Seal Material Selection
| Material | Best For | Key Limitation |
|---|---|---|
| NBR (Nitrile) | Standard mineral hydraulic oil, general-purpose use | Not resistant to chlorinated solvents or aromatics |
| Polyurethane | High-cycle or heavy-duty environments requiring abrasion resistance | Temperature range narrower than NBR in some formulations |
| PTFE / PTFE-composite | High-pressure applications, low-friction requirements | Requires precise groove geometry; not elastomeric |
Material mismatch causes rapid swelling or degradation. EPDM seals in mineral oil, for instance, will deteriorate quickly. The fluid type, operating temperature, and pressure rating of the specific cylinder all factor into the correct choice.
Detroit Sealing Components (DSC) supplies forklift hydraulic cylinder seal components — including piston seals, rod seals, wiper seals, O-rings, and backup rings — across NBR, polyurethane, and PTFE-based compounds. For non-standard or hard-to-source specifications, DSC's technical team and ISO 17025 accredited lab can match the right compound to your cylinder's exact pressure and temperature requirements.
Forklift Hydraulic Cylinder Seal Inspection and Replacement Schedule
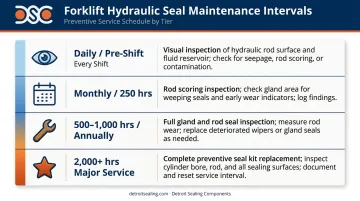
Inspection and replacement frequency depends on usage intensity, operating environment, fluid quality, and load cycles. There is no single universal interval — use this table as a baseline and adjust based on your specific conditions.
| Interval | Action |
|---|---|
| Daily / Pre-shift | Visual check for oil film on rod or pooling beneath mast; check hydraulic fluid level (OSHA and Crown OEM requirement) |
| Monthly (~250 hrs) | Wipe rod clean and inspect for scoring or surface wear; monitor fluid level trend for slow-leak indication |
| 500–1,000 hrs or annually | Comprehensive gland and rod seal inspection; plan replacement if oil weeping or rod wear is present |
| 2,000+ hrs or major service | Full seal kit replacement as preventive measure, regardless of visible condition, particularly for high-cycle or multi-shift operations |
Factors that accelerate wear beyond normal intervals:
- Contaminated or degraded hydraulic fluid — industry data consistently identifies contamination as the leading cause of hydraulic component failure; regular fluid changes and filter maintenance directly extend seal life
- Cylinder overloading beyond rated capacity increases pressure spikes that stress seals beyond their design limits
- Temperature extremes cause repeated thermal cycling of elastomers, hardening NBR over time and reducing its sealing effectiveness
Frequently Asked Questions
Why is my hydraulic lift cylinder leaking after seal replacement?
Post-replacement leaks are most commonly caused by reversed seal orientation (wrong face toward pressure), insufficient gland torque, rod surface damage that wasn't addressed before reinstalling seals, or seals with dimensions or material that don't match the cylinder specification.
What are the components of a hydraulic cylinder seal?
The main components are the piston seal (prevents internal fluid bypass), the rod or gland seal (prevents external leakage along the rod), the wiper/dust seal (keeps contaminants off the rod), and O-rings with backup rings used at static joints and port connections.
How often should forklift hydraulic cylinder seals be replaced?
Inspect seals every 500–1,000 operating hours or annually under normal conditions. Replace proactively at major service intervals — or sooner if leaking, performance loss, or rod wear appears. High-cycle, multi-shift operations typically need more frequent attention.
Can I replace forklift hydraulic cylinder seals without professional help?
Experienced maintenance personnel can handle the replacement with the right tools and a correct OEM diagram, provided disassembly sequence, seal orientation, and torque specs are followed precisely. If bore or rod damage is found, professional cylinder rebuilding is the safer route.
What seal material is best for forklift hydraulic cylinders?
NBR is the standard choice for mineral-based hydraulic oil. For heavy-duty or high-pressure applications, polyurethane (better abrasion resistance) or PTFE-composite seals are worth considering. The right material depends on pressure rating, operating temperature, and fluid type — not just what was originally fitted.
What tools do I need to replace forklift hydraulic cylinder seals?
Core tools include:
- Correctly sized gland wrench
- Plastic seal removal picks
- Seal installation tool or thin guide sleeve
- Calibrated torque wrench
- Clean hydraulic fluid for lubrication
- Vacuum bleeder for post-reassembly air purging