Introduction
Hydraulic seals are the critical barriers that maintain system pressure and prevent fluid loss in industrial equipment. When these small elastomeric components fail, the consequences extend far beyond a simple leak. Manufacturing facilities report downtime costs ranging from $50,000 to $200,000 per hour when hydraulic systems fail unexpectedly, representing lost revenue that cannot be recovered. Beyond financial impact, seal failures create safety risks including sudden pressure loss, fluid injection injuries, and equipment malfunctions that endanger operators.
Those consequences compound when the same seal fails repeatedly — which happens more often than it should. A leaking rod seal gets replaced, only to fail again weeks later because the underlying contamination problem or thermal stress was never diagnosed.
This article walks through the five primary root causes of hydraulic seal failure, how to identify each one, and what it takes to prevent them from recurring. Done right, these measures can extend seal life three to five times beyond what reactive maintenance alone achieves.
Key Takeaways
- Hydraulic seals fail in five distinct modes: external leakage, internal leakage, thermal degradation, contamination damage, and catastrophic pressure loss
- Particles as small as 4 microns, heat beyond material limits, bad installation, and fluid-seal chemical mismatches are the leading root causes
- Fix failures by diagnosing the mode, finding the root cause, selecting the right seal material, prepping surfaces, and validating under load
- Repair minor damage; replace the cylinder when bore scoring exceeds 0.005 inches or repair costs hit 50–60% of a new unit's price
What Is a Hydraulic Seal?
Hydraulic seals are elastomeric components designed to contain pressurized fluid and prevent leakage between moving or static parts in hydraulic systems. These precision-molded components form the critical barrier that maintains system pressure while allowing controlled motion in cylinders, pumps, and valves.
Two Main Seal Categories
- Dynamic seals accommodate movement between components — such as piston rods extending and retracting through cylinder housings — while sliding against metal surfaces at varying speeds and pressures.
- Static seals create barriers between fixed components that don't move relative to each other, such as end caps bolted to cylinder bodies or port connections in manifolds.
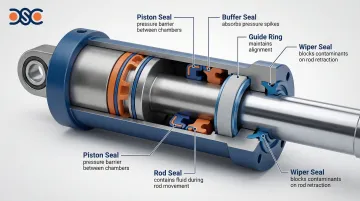
Critical Seal Types and Functions
- Piston seals create the primary pressure barrier between high- and low-pressure chambers inside the cylinder, preventing internal fluid bypass so the piston can generate force.
- Rod seals contain pressurized fluid within the cylinder housing as the rod extends and retracts, preventing external leakage and environmental contamination.
- Wiper seals block contaminants from entering the cylinder by scraping contaminants from the rod surface as it retracts, protecting internal sealing components.
- Buffer seals absorb pressure spikes and sudden pressure surges that could damage primary sealing elements — particularly in systems with rapid directional changes or shock loading.
- Guide rings maintain proper alignment between the piston or rod and the cylinder bore, preventing metal-to-metal contact that causes accelerated wear.
Common Problems With Hydraulic Seals
Hydraulic seal failures follow predictable patterns with identifiable symptoms. Recognizing these patterns enables rapid diagnosis and prevents minor issues from escalating into catastrophic failures.
Problem 1: External Leakage (Visible Fluid Loss)
External leakage is the most obvious seal failure mode, characterized by hydraulic fluid escaping from the cylinder into the surrounding environment.
Symptoms include:
- Fluid weeping or dripping from the rod seal area
- Visible oil film coating the cylinder rod
- Fluid pooling beneath equipment or on the floor
- Contaminated work areas requiring frequent cleanup
Likely causes:
- Rod seal wear from normal service life
- Damaged wiper seals allowing contaminants to enter
- Contamination damage creating leak paths
- Improper installation that damaged seal lips during assembly
Problem 2: Internal Leakage (Performance Loss)
Internal leakage occurs when pressurized fluid bypasses the piston seal, moving from the high-pressure chamber to the low-pressure chamber. This invisible failure mode degrades system performance by 15-40% before operators typically detect the problem.
Symptoms include:
- Cylinder drift when attempting to hold a position under load
- Slow or erratic movement during extension or retraction
- Loss of force output or inability to develop rated pressure
- Increased cycle times as the system compensates for lost pressure
Likely causes:
- Piston seal wear from extended service
- Seal extrusion caused by pressure spikes exceeding material limits
- Hardened or cracked seals that can no longer conform to bore surfaces
Detection methods: According to SAE J1336 standards, a cylinder holding rated pressure for 5 minutes should show no more than 3 mm of rod movement. Drift rates exceeding 1 mm/min indicate significant internal leakage requiring immediate attention.
Problem 3: Excessive Heat Generation (Thermal Degradation)
Thermal degradation accelerates seal aging and creates a cascading failure cycle where heat causes seal hardening, which increases friction, generating even more heat.
Symptoms include:
- Hot cylinder body that's uncomfortable to touch
- Discolored seals showing darkening or brittleness
- Burnt odor from overheated hydraulic fluid
- Fluid temperature exceeding 60°C (140°F)
Likely causes:
- Inadequate lubrication creating boundary friction conditions
- Excessive friction from worn guide rings allowing metal contact
- High ambient operating temperatures without adequate cooling
Problem 4: Contamination-Related Damage (Abrasive Wear)
Contamination is the leading cause of premature hydraulic seal failure. Particles as small as 4 microns can embed in seal material and act like sandpaper against cylinder rods and bores.
Symptoms include:
- Scoring visible on rod surfaces in a linear pattern
- Premature seal wear occurring within months rather than years
- Abrasive particles visible in hydraulic fluid samples
- Scratched seal surfaces showing embedded contaminants
Likely causes:
- Failed wiper seals allowing external contamination to enter
- Inadequate filtration failing to remove particles
- Contaminated replacement seals introduced during maintenance
- Poor installation practices in unclean work environments
Problem 5: Catastrophic Seal Failure (Sudden System Loss)
Catastrophic failures represent complete seal destruction, typically occurring suddenly and without warning when operating conditions exceed material capabilities.
Symptoms include:
- Sudden complete loss of system pressure
- Large volume fluid discharge creating safety hazards
- Seal material fragments visible in fluid or cylinder
- Immediate system shutdown and inability to operate
Likely causes:
- Pressure spikes exceeding seal ratings — standard nitrile O-rings can extrude at pressures as low as 1,500 PSI without backup rings
- Chemical incompatibility causing rapid material degradation
- Installation damage that created immediate failure points
Why Hydraulic Seals Fail (Root Causes)
Understanding why seals fail—not just how they fail—is essential for implementing effective solutions. The five primary root causes relate to operating conditions, material selection, and maintenance practices.
Fluid Contamination
Particulate contamination acts as an abrasive between seals and mating surfaces, creating a grinding action that rapidly wears both elastomeric and metal components. Industry data indicates that maintaining fluid cleanliness to ISO 4406 standards of 18/16/13 or better is critical for component longevity in high-pressure systems.
Particles in the 4 to 14 micron range are particularly destructive because they match the dynamic clearances between seals and cylinder walls. These microscopic contaminants embed in soft seal materials, creating abrasive surfaces that score rods and bores. Dropping one ISO cleanliness class (from 18/16/13 to 19/17/14) represents a doubling of particle concentration, accelerating wear rates sharply.
Effective contamination control requires filtration systems with Beta ratios of β(c) ≥ 200, ensuring 99.5% removal efficiency for target particle sizes. Industry testing shows that switching from contaminated to clean fluid can increase seal and bearing life by up to 500 times.
Thermal Degradation
Excessive heat causes irreversible chemical changes in seal materials, resulting in hardening, loss of elasticity, and cracking. Each seal material has specific temperature limits beyond which degradation accelerates rapidly.
Material temperature limits:
- Nitrile (NBR): Standard operating range -34°C to +100°C; degradation accelerates above 82°C (180°F)
- Polyurethane (PU): Operating range -35°C to +110°C; susceptible to hydrolysis in water-based fluids above 50°C
- Fluorocarbon (FKM/Viton): Operating range -26°C to +205°C; suitable for high-temperature applications

Heat sources include high fluid temperatures from inadequate cooling, friction from excessive cylinder speed, external heat exposure from nearby equipment, and inadequate heat dissipation in undersized reservoirs. Seals hardened by thermal exposure lose the ability to conform to surface irregularities — the result is an immediate leak path and rapid system failure.
Improper Installation
Installation errors create immediate leak paths or accelerated wear points that cause premature failure. Common installation mistakes:
- Cutting seal lips on sharp threads or edges during assembly
- Installing pressure-activated seals in the wrong orientation
- Using incorrect seal sizes — causing over-compression or insufficient contact
- Introducing contamination from unclean work areas
- Skipping lubrication, which causes tearing or distortion on installation
Proper installation requires:
- Chamfered lead-in edges on cylinder tubes and rods
- Protective sleeves over threads and sharp edges
- Dedicated seal installation tools (not screwdrivers or improvised substitutes)
- Lubrication with system-compatible fluid before assembly
Pressure-Induced Failure (Extrusion)
Seal extrusion occurs when system pressure forces seal material into the clearance gap between the piston or rod and the cylinder wall. While operating pressure contributes to extrusion risk, pressure spikes are the primary culprit.
Pressure thresholds for common materials:
- Standard nitrile O-rings: Begin extruding around 1,500 PSI (10.3 MPa) without backup rings
- Polyurethane seals: Typically withstand up to 3,000 PSI (20.7 MPa) before extrusion risk increases
- PTFE seals: Show measurable creep starting at 2,175 PSI; require anti-extrusion rings above 5,075 PSI
Inadequate backup rings or incorrect seal material hardness increases extrusion susceptibility. Once a seal begins to extrude, damaged material creates a permanent leak path — one that persists even after pressure returns to normal.
Chemical Incompatibility
Incompatible hydraulic fluids cause seal swelling, shrinking, softening, or chemical breakdown. The seal material must be matched to the specific fluid type and any additives present in the formulation.
Fluid compatibility by seal material:
- Mineral oil (HL, HM, HV): Compatible with NBR, HNBR, FKM, PU, and PTFE; incompatible with EPDM (causes severe swelling)
- Water-glycol (HFC): Compatible with NBR, EPDM, and PTFE; FKM not recommended, PU limited to temperatures below 60°C
- Phosphate ester (HFD-R): Compatible with EPDM, PTFE, and special FKM grades; incompatible with standard NBR and PU
- Biodegradable (HEES): Compatible with FKM, PTFE, and PU; NBR compatibility depends on specific formulation
Fluid additives and contamination can also cause chemical attack even when the base fluid is compatible with the seal material.
Consequences of Ignoring Seal Issues
Delaying seal repairs creates cascading damage throughout hydraulic systems. Initial seal failure leads to fluid loss, which draws air in and causes cavitation damage to pumps and valves — while degraded seal material circulates and damages downstream components.
The consequences extend well beyond the seal itself:
- Safety: Sudden pressure loss causes load drops, high-pressure fluid injection injuries, and equipment failure during critical operations
- Cost: Emergency repair premiums, unplanned downtime, and secondary component damage compound the original repair bill
- Compliance: Fluid spills trigger environmental violations and cleanup costs that dwarf the price of a timely seal replacement
How to Fix Hydraulic Seal Failure (Step-by-Step)
Proper diagnosis before repair prevents wasted effort and repeat failures. This systematic process ensures root causes are addressed, not just symptoms.
Step 1: Diagnose the Specific Failure Mode
Begin by determining exactly how the seal failed:
- Inspect for external leakage: Check the rod seal area, wiper seal, end caps, and port connections for fluid accumulation or weeping
- Test for internal leakage: Observe cylinder drift under load, measure cycle time changes, and monitor pressure loss over time
- Document operating conditions: Record temperature, pressure, cycle frequency, and environmental factors when failure occurs
- Examine removed seals: Look for specific failure patterns including wear location, hardness changes, cracks, extrusion damage, and chemical attack signs
Physical inspection of removed seals reveals the failure mode at a glance:
- Hardened, darkened seals → thermal degradation
- Feathered or rolled edges → extrusion damage
- Embedded particles or scoring → contamination
- Swelling or softening → chemical incompatibility
Step 2: Identify the Root Cause Category
Determine the underlying cause, not just the visible symptom:
- Contamination-related: Check for scoring patterns, abrasive particles in fluid samples, and failed filtration components
- Thermal factors: Measure operating temperatures, identify friction sources, and verify cooling system adequacy
- Pressure conditions: Review pressure gauge data for shock or spike events, verify relief valve settings and operation
- Chemical compatibility: Confirm fluid type matches seal material specifications, check for fluid contamination or incorrect fluid addition
- Installation errors: Verify correct seal type, size, and orientation from maintenance records and physical inspection
Installing a new seal without correcting the root cause — contaminated fluid, excessive heat, wrong material — guarantees the same failure within weeks.
Step 3: Select the Correct Replacement Seal
Seal selection requires matching multiple specifications to operating conditions:
Verify exact specifications:
- Dimensional measurements (inside diameter, outside diameter, cross-section)
- Material compound formulation
- Hardness (durometer reading in Shore A)
- Pressure rating for the application
- Temperature range covering operating extremes
Match material to conditions: Consider fluid type compatibility, temperature extremes during operation, pressure peaks including transient spikes, and chemical exposure from fluid additives or contamination.
For applications requiring specialized seal compounds or custom solutions, consult seal material specialists with access to diverse elastomer formulations and testing capabilities to ensure optimal material selection. Standard catalog compounds won't cover every application — when operating conditions are unusual or extreme, a specialist with laboratory testing capabilities and a broad compound library can identify the right material before failure recurs.
Ensure kit completeness: Quality seal kits include all required components — seals, backup rings, O-rings, and wear rings specified for the cylinder design. Avoid "universal" kits; OEM-matched components ensure dimensional accuracy and material compatibility for your specific cylinder.
Step 4: Prepare for Installation
Skipping preparation steps is one of the most common causes of repeat seal failure after an otherwise correct repair:
Clean all components thoroughly: Remove all old seal material, inspect cylinder bore and rod for damage, and clean seal grooves completely to remove debris and degraded material.
Inspect mating surfaces: Check the rod for scoring or pitting (reject if scoring depth exceeds 0.005 inches), measure bore for wear or out-of-round condition, and verify surface finish meets specifications (typically 0.1 to 0.3 µm Ra for rods, 0.1 to 0.4 µm Ra for bores).
Address root cause issues: Replace filters if contamination caused failure, repair damaged rods through polishing or re-chroming, install cooling systems if thermal degradation occurred, and correct alignment problems identified during inspection.
Prepare proper tools: Assemble seal drivers appropriate for seal size and type, system-compatible assembly lubricant, protective sleeves for sharp edges, and measuring tools to verify proper installation.
Verify cleanliness: Even microscopic particles introduced during assembly can cut seal lips or embed in grooves — clean the work area and all components before installation begins.
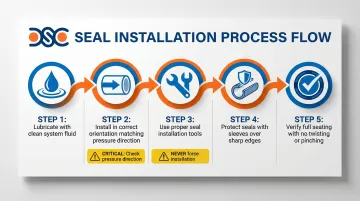
Step 5: Install Seals Correctly
Follow these critical installation steps:
- Lubricate seals with clean system fluid—never petroleum jelly or incompatible lubricants that could cause seal swelling or degradation
- Install in correct orientation: Verify seal lip direction matches pressure direction per manufacturer specifications; pressure-activated seals installed backward will fail immediately
- Use proper tools: Employ seal installation tools and drivers to avoid stretching, twisting, or cutting seal lips; never use screwdrivers or sharp metal tools
- Protect seals during installation: Use protective sleeves over threads and sharp edges that could damage seal lips as components slide together
- Verify proper seating: Ensure seals are fully seated in grooves without twisting or pinching; twisted seals create immediate leak paths
Step 6: Test and Validate the Repair
Comprehensive testing ensures the repair addresses the original failure:
Initial pressure test: Gradually increase pressure to rated levels while monitoring for external leaks at all seal locations.
Full stroke operation: Run the cylinder through its complete stroke range, checking for smooth operation, proper speed, and absence of unusual sounds indicating binding or misalignment.
Load testing: Verify the cylinder holds pressure without drift under actual working loads, performs work cycles correctly, and develops rated force output.
Temperature monitoring: Ensure the system operates within normal temperature ranges (below 60°C/140°F for standard nitrile seals) without excessive heat generation.
Post-operation inspection: Examine for any weeping or early signs of problems immediately after testing, then recheck after 24-48 hours of operation to confirm long-term seal integrity.
When Should You Fix vs Replace Hydraulic Seals?
The repair versus replacement decision depends on cylinder condition, failure severity, and total cost of ownership. Industry benchmarks suggest that when repair costs approach 50-60% of new unit cost, replacement is usually the smarter financial call.
Scenario 1: Recent Seal Installation with Premature Failure
Repair makes sense when a specific root cause is identifiable and correctable — improper seal orientation, contamination during assembly, or a one-time contamination event. Fix the procedure, reseal correctly, and move on.
Consider replacement when:
- Failures keep recurring despite correct reinstallation
- Bore damage or chronic misalignment is confirmed
- The cylinder is fundamentally undersized for the application load
Multiple failures after proper installation point to problems seals alone can't solve.
Scenario 2: Cylinder Bore or Rod Damage
Surface damage thresholds determine the path:
| Condition | Repair Viable? |
|---|---|
| Rod scoring < 0.005" deep | Yes — polish smooth |
| Bore damage, cylinder body intact | Yes — sleeving or honing |
| Bore severely scored or out-of-round | No — replace |
| Rod pitting, deep corrosion, or flaking chrome | No — replace |
| Rod straightness > 0.02" per foot | No — replace |
When the cylinder body remains structurally sound, bore damage is often repairable. Once the rod or bore exceeds these thresholds, new seals won't hold regardless of material quality.
Scenario 3: Age and Service History
Reseal and continue when the cylinder is under 5 years old, on its first seal failure, with no other component wear. Normal seal degradation after 4,000–5,000 operating hours is expected — this is a routine maintenance event, not a system problem.
Evaluate full replacement when the cylinder is 10+ years old with multiple prior repairs or recurring failures despite correct maintenance. At that point, cumulative repair costs typically exceed replacement cost, and unplanned downtime risk outweighs the savings of patching an aging unit.
Common Mistakes to Avoid When Fixing Hydraulic Seal Failures
Even a correct diagnosis can unravel if the repair itself introduces new problems. These three mistakes account for most repeat failures:
- Replacing seals without addressing the root cause — new seals will fail just as fast if contamination, pressure spikes, or thermal stress remain unresolved. Identify and fix the underlying condition first.
- Using "universal" seal kits — these may fit dimensionally but often lack the material properties required for your specific pressure, temperature, and chemical environment, leading to premature failure.
- Skipping surface inspection — installing seals on scored rods or damaged bores creates immediate leak paths. Always inspect and prepare seating surfaces before fitting new components.
Preventive Measures to Avoid Future Seal Failures
Proactive maintenance extends seal life three to five times beyond reactive approaches and prevents costly emergency repairs. The investment in preventive measures pays off through reduced downtime and extended component life.
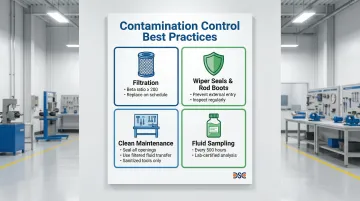
Implement Rigorous Contamination Control
Contamination control is the single most effective preventive measure:
- Maintain proper filtration: Use filters rated for system requirements (Beta ratio ≥ 200 for critical systems), and replace filters on schedule, not just when clogged or when pressure drop indicates saturation
- Install effective wiper seals and rod boots: These components prevent external contamination from entering the system and protect rod surfaces from environmental exposure
- Practice clean maintenance procedures: Keep work areas clean during seal replacement, use filtered transfer equipment for fluid additions, and seal all system openings immediately during service
- Fluid sampling: Analyze hydraulic fluid every 500 operating hours to track contamination trends and fluid condition before problems develop
Manage Operating Temperatures
Thermal management prevents the accelerated aging that occurs when seals operate above material temperature limits:
- Monitor fluid temperatures: Install temperature gauges at critical points and maintain operating temperatures within seal material limits (typically below 82°C/180°F for nitrile seals)
- Provide adequate cooling: Add heat exchangers if systems consistently run hot, increase reservoir size for better heat dissipation, and ensure adequate airflow around hydraulic components
- Address friction sources: Maintain proper system lubrication, replace worn guide rings before they allow metal-to-metal contact, and correct alignment issues that create binding and friction
Ensure Proper Material Selection and Compatibility
Material selection determines seal longevity and reliability. Match seal materials to application requirements by confirming three things:
- Fluid compatibility: Verify the compound works with your hydraulic fluid type — mineral oil, synthetic, water-glycol, or biodegradable
- Temperature range: Confirm materials can withstand operating temperature extremes, not just typical conditions
- Pressure ratings: Ensure pressure ratings exceed system maximums, including transient spikes
For critical or specialized applications, use ISO 17025 accredited laboratory testing to validate material performance before deployment. Detroit Sealing Components maintains this accreditation specifically for custom material development when standard compounds don't meet application requirements.
Document fluid types and seal materials: Maintain detailed records to prevent incompatible fluid additions during service. A single incorrect fluid addition can destroy an entire system's seals within hours.
Frequently Asked Questions
What causes hydraulic cylinder seal failure?
Five root causes account for most hydraulic seal failures:
- Fluid contamination — abrasive particles as small as 4 microns score seal surfaces
- Thermal degradation — heat above the seal material's rated limit accelerates breakdown
- Improper installation — assembly damage from sharp edges or incorrect tooling
- Pressure extrusion — spikes beyond the seal's pressure rating force material into clearance gaps
- Chemical incompatibility — mismatched fluid and seal material causes swelling or cracking
How to tell if hydraulic cylinder seals are bad?
Watch for these signs:
- External leakage — fluid visible on the rod or pooling beneath the equipment
- Cylinder drift — load-induced movement exceeding 1 mm/min indicates internal bypass
- Performance loss — slower actuation or reduced force output under normal conditions
- Physical damage — hardened, cracked, or extruded seal material with discoloration or embedded debris
Why does my hydraulic O-ring keep breaking?
Repeated failure usually points to one of four problems: pressure spikes above the O-ring's rating (standard O-rings without backup rings can fail above 1,500 PSI), installation cuts from sharp edges or improper tools, chemical incompatibility breaking down elasticity, or excessive clearance gaps that allow extrusion. Fixing the symptom without identifying which cause applies will not stop the cycle.