O-rings are fundamental components in a wide range of sealing applications, from automotive systems to high-pressure industrial machinery. Their role in ensuring effective sealing cannot be overstated, as even the slightest deviation in size can compromise performance, leading to leakage, equipment failure, or downtime.
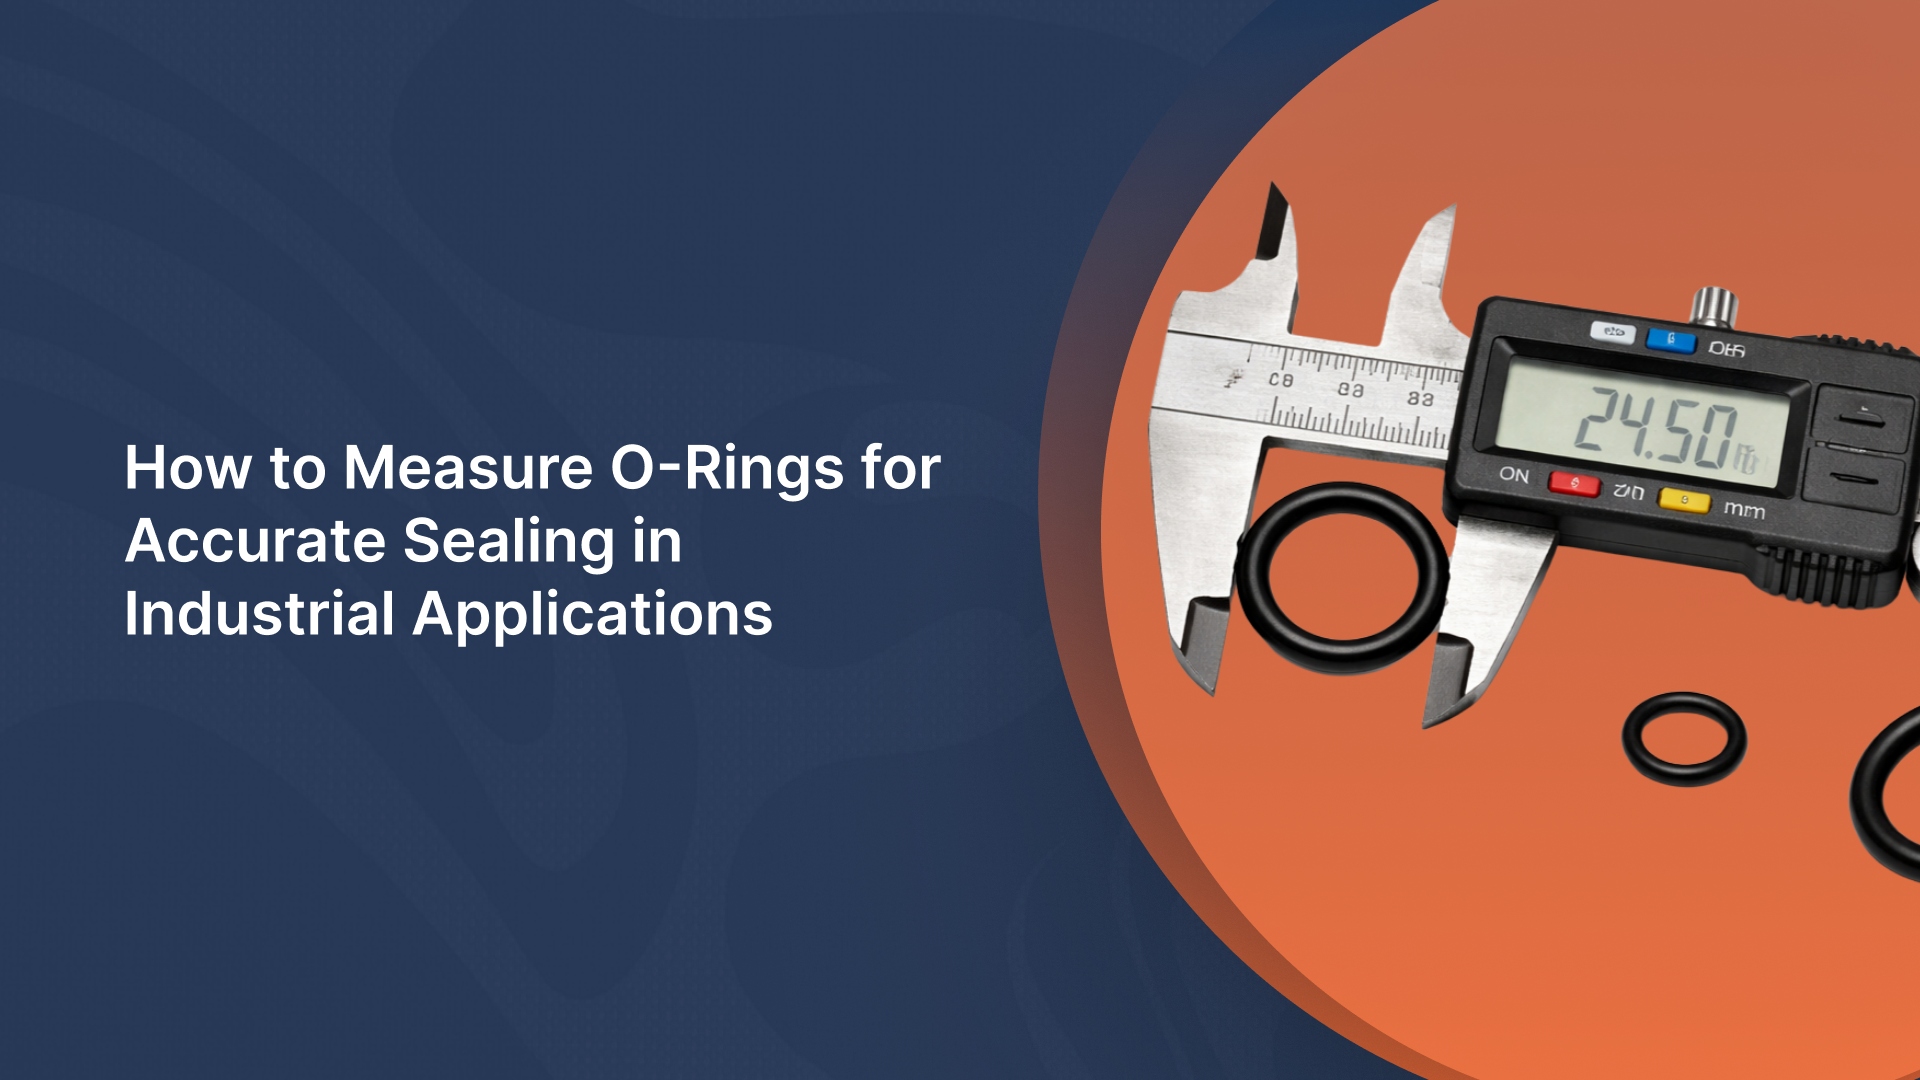
Accurate measurement of O-rings is crucial for achieving optimal sealing performance. Whether you are replacing an O-ring or designing a custom solution, understanding how to properly measure these components ensures that they fit correctly and function as intended.
In this blog, we will cover the essential steps and tools required to measure O-rings with precision, as well as common pitfalls to avoid, so you can achieve the best possible results in your sealing applications.
In a Nutshell
Measure O-rings' Inner Diameter (ID), Outer Diameter (OD), and Cross-Sectional Diameter (CS) for proper fit.
Use calipers and micrometers for accurate measurements, ensuring the O-ring is clean and undamaged.
Avoid common mistakes like misreading tools or neglecting O-ring deformation.
Select the right material based on operating conditions like temperature and pressure.
Consider custom O-rings for unique applications with tight tolerances.
Key O-Ring Measurements to Know
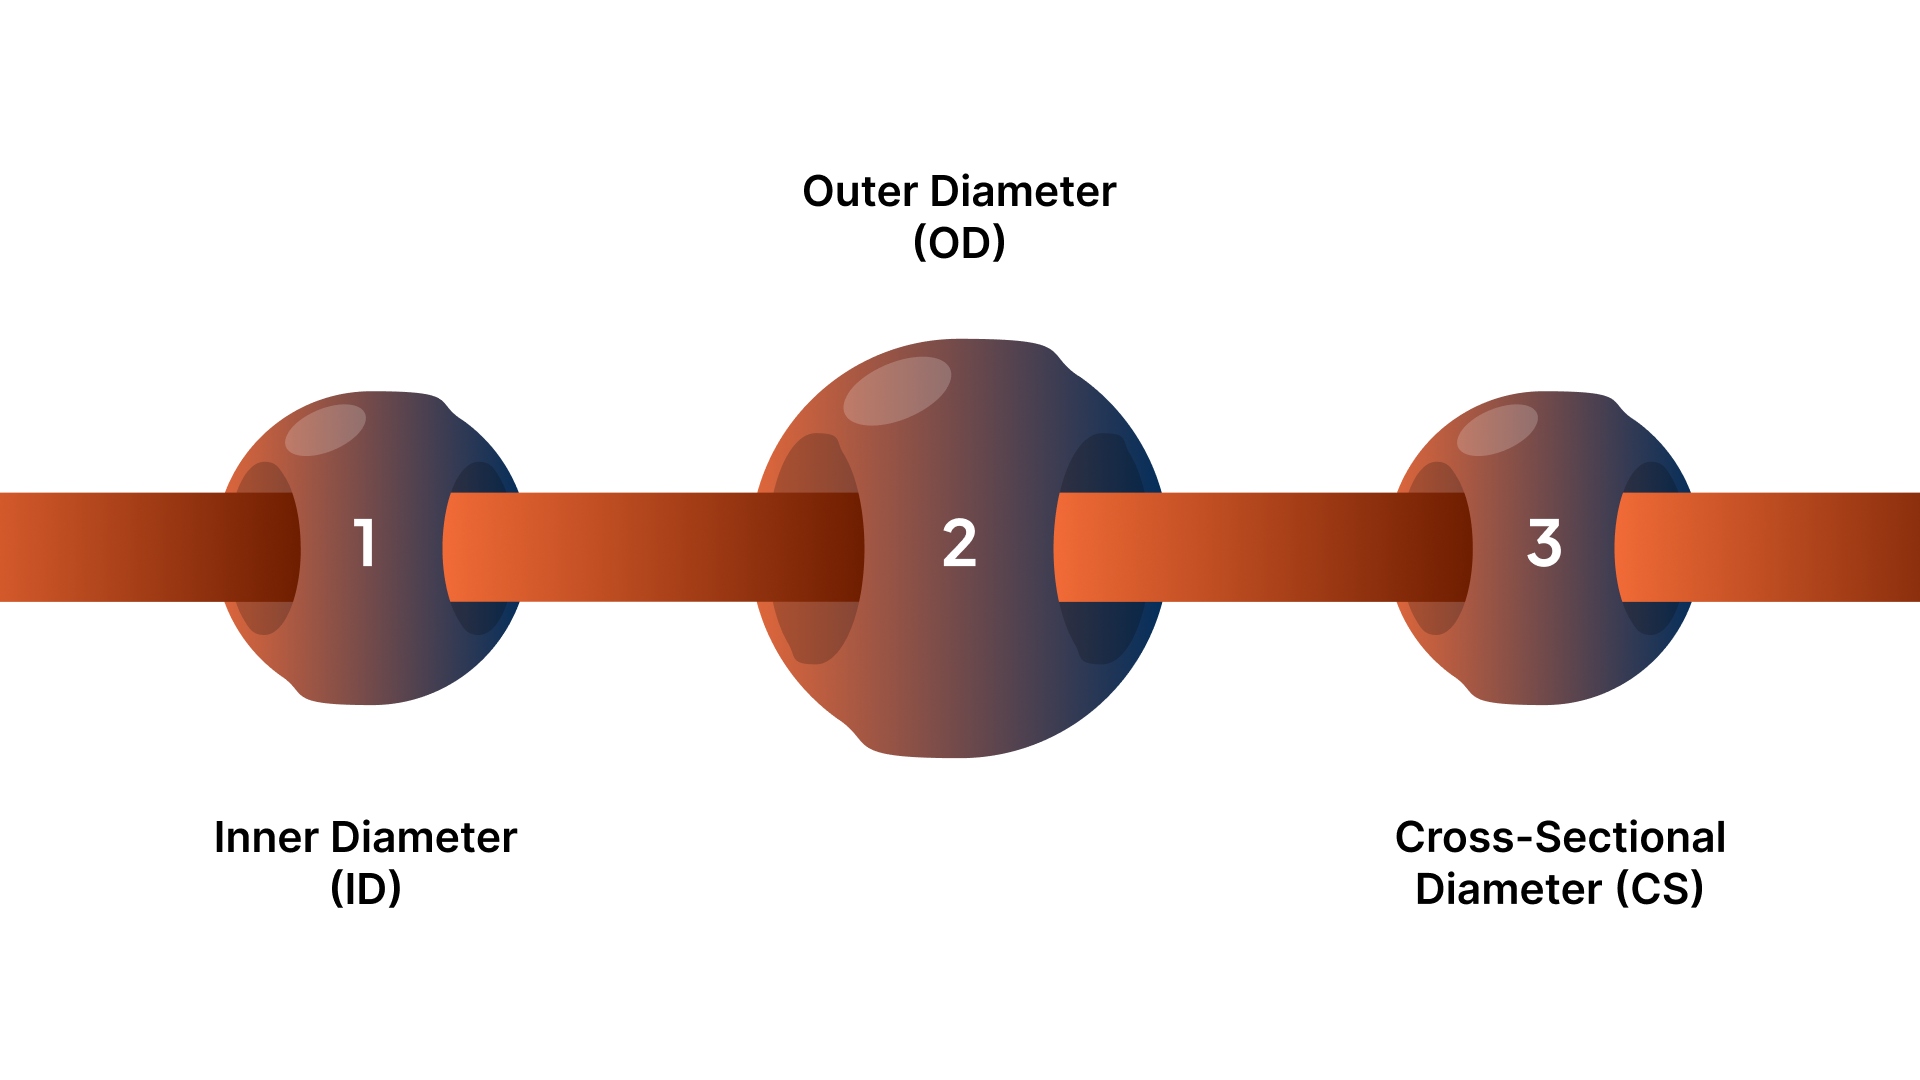
To ensure an O-ring fits properly and performs as expected, there are three key measurements you need to focus on: Inner Diameter (ID), Outer Diameter (OD), and Cross-Sectional Diameter (CS). Understanding each of these measurements is critical for selecting the correct O-ring for your application.
1. Inner Diameter (ID)
Definition and Significance: The inner diameter refers to the diameter of the hole or the space where the O-ring will sit. This measurement ensures the O-ring fits securely into the groove of the application, preventing leakage.
How to Measure: The inner diameter is measured from one edge of the ring to the opposite edge, ensuring a precise reading to avoid under- or over-sizing the O-ring. Typically, this is done using a caliper.
2. Outer Diameter (OD)
Importance: The outer diameter is crucial because it ensures the O-ring fits within the appropriate gland or housing. An inaccurate OD can lead to improper compression and a poor seal.
How to Measure: This measurement is taken across the widest point of the O-ring. Using a digital caliper or micrometer can provide high precision for this measurement.
3. Cross-Sectional Diameter (CS)
What It Is: The cross-sectional diameter refers to the thickness of the O-ring itself, essentially the "height" of the O-ring when viewed from the side. It directly affects the compression and sealability of the O-ring.
Why It's Essential: The cross-section affects how well the O-ring compresses in the groove, which is vital for preventing leakage. An incorrect cross-sectional measurement can lead to improper sealing pressure.
How to Measure: This is measured using the caliper across the O-ring’s thickness at its widest point.
Tools You’ll Need to Measure O-Rings
Accurate O-ring measurement requires the right tools. Here are the most commonly used instruments for measuring O-rings and ensuring precision:
Tool | Usage | Why It’s Useful |
Caliper | Measure inner diameter, outer diameter, and cross-section. | Versatile and precise, ideal for all O-ring dimensions. |
Micrometer | Measure cross-sectional diameter with high precision. | Provides highly accurate readings for smaller O-rings. |
Ruler or Tape Measure | Rough measurement for larger O-rings. | Quick estimate, suitable for larger O-rings. |
Specialized O-Ring Tools | Use dedicated kits or templates for sizing. | Simplifies and ensures consistent measurement for multiple O-rings. |
Step-by-Step Guide to Measuring an O-Ring
To ensure accurate O-ring measurements, follow this step-by-step process:
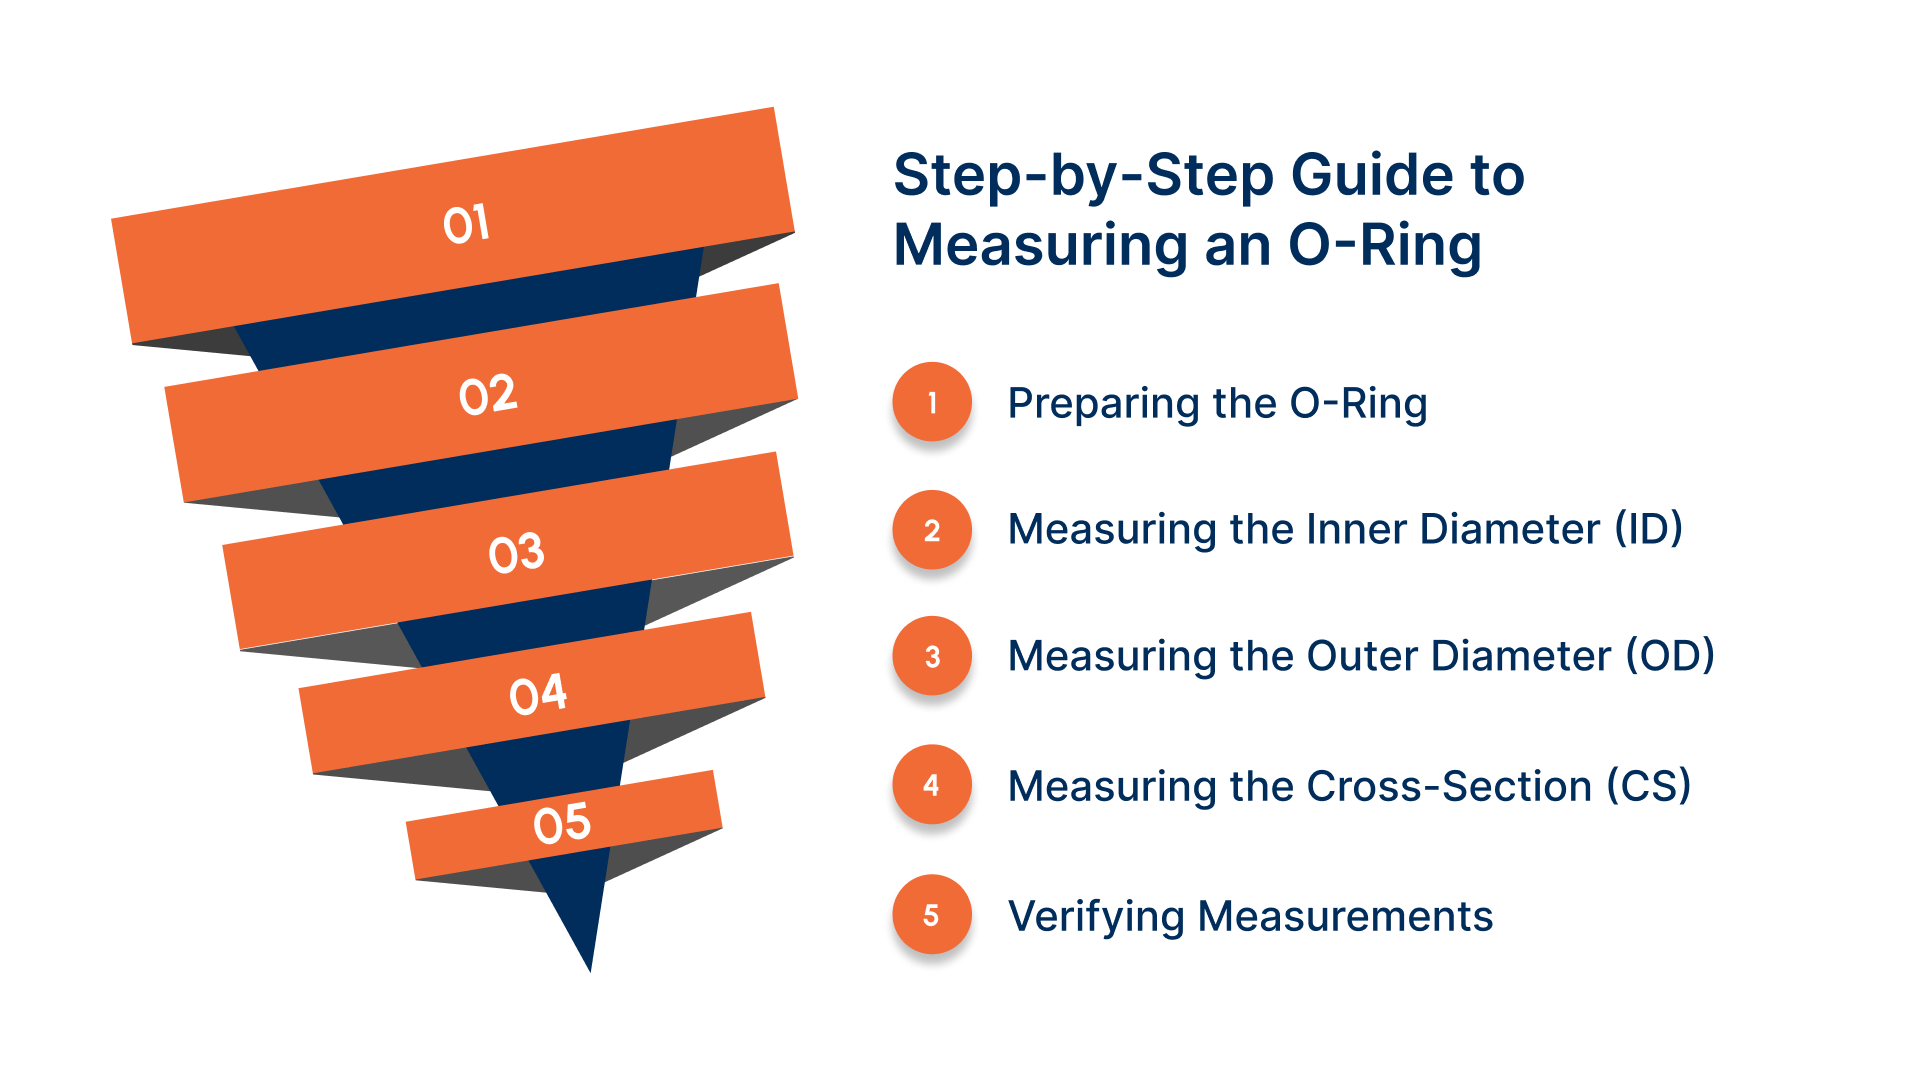
Step 1: Preparing the O-Ring
Inspect the O-Ring: Before measuring, check for any damage or deformation, as this can affect the measurement.
Clean the O-Ring: Ensure the O-ring is free from dirt, oil, or debris, as contaminants can distort the measurement.
Step 2: Measuring the Inner Diameter (ID)
Use a Caliper: Place the caliper’s jaws inside the O-ring and gently close them until they make contact with both sides of the inner diameter.
Read the Measurement: Ensure the caliper is parallel to the ring and record the inner diameter.
Step 3: Measuring the Outer Diameter (OD)
Use a Caliper: Place the caliper’s jaws around the outer circumference of the O-ring. Make sure the jaws are perpendicular to the O-ring’s surface.
Read the Measurement: Again, ensure that the caliper is aligned correctly to avoid distortion in the reading.
Step 4: Measuring the Cross-Section (CS)
Use a Caliper or Micrometer: Measure the thickness of the O-ring at its widest point. For greater accuracy, especially in smaller O-rings, use a micrometer.
Check the Measurement: Ensure the caliper or micrometer is at the correct angle to get an accurate thickness reading.
Step 5: Verifying Measurements
Double-Check: After taking all measurements, verify them to ensure consistency and accuracy. It's best to measure multiple times to confirm accuracy.
Compare with Specifications: If available, compare your measurements with the manufacturer’s specifications or size charts to ensure they align with the required dimensions.
Common Mistakes to Avoid When Measuring O-Rings
Measuring O-rings correctly is essential for ensuring their effectiveness in sealing applications. Here are the common mistakes to avoid, along with strategies to mitigate each risk:
Mistake | Risk | Mitigation Strategy |
Misreading Measurement Tools | Inaccurate measurements lead to improper fit and sealing. | Double-check readings and calibrate tools before use. |
Neglecting Deformation | Incorrect measurements due to O-ring shape distortion. | Inspect O-ring for deformation; replace if necessary before measuring. |
Overlooking Tolerances | Selection of an O-ring that doesn’t fit within the required specifications. | Refer to the manufacturer’s specifications and tolerance ranges. |
Inconsistent Measuring Angles | Misaligned measurements affect accuracy. | Ensure proper alignment and use the correct angle when measuring cross-section. |
How to Choose the Right O-Ring Based on Measurements
Selecting the right O-ring is crucial for ensuring optimal sealing performance. Here’s a framework to guide your decision-making:
1. Confirm Key Measurements
Inner Diameter (ID), Outer Diameter (OD), and Cross-Sectional Diameter (CS) are the foundational metrics to start with. Ensure these measurements are accurate to ensure a correct fit.
2. Reference the O-Ring Sizing Chart
Step 1: Input your measured dimensions (ID, OD, CS) into a standard O-ring sizing chart.
Step 2: Match your measurements with available standard sizes. Use the chart to identify the closest fit and determine the appropriate size.
3. Assess Material Compatibility
Step 1: Evaluate the operating conditions: temperature, pressure, chemical exposure, and wear.
Step 2: Select the material that meets the specific demands of your application (e.g., NBR for oil resistance, FKM for high heat, EPDM for outdoor use).
Outcome: Proper material ensures longevity, resistance to environmental factors, and reliable sealing.
4. Review Additional Requirements
Step 1: Check if there are any specific certifications required for your O-ring (e.g., FDA, NSF).
Step 2: Verify the O-ring’s regulatory compliance to ensure it meets necessary standards for your industry (e.g., medical, food & beverage, drinking water).
5. Consider Custom O-Ring Solutions
Step 1: If the standard sizes or materials don’t meet your needs, consider custom O-rings.
Step 2: Collaborate with an experienced supplier, like Detroit Sealing Components, for custom sizing, material selection, and specialized requirements.
Outcome: Custom O-rings ensure the perfect fit for challenging or unique sealing applications, guaranteeing performance and durability.
Best Practices for Installing O-Rings
Proper installation ensures O-rings create a reliable seal, preventing leaks and extending the lifespan of machinery and systems.
Basic Installation Steps
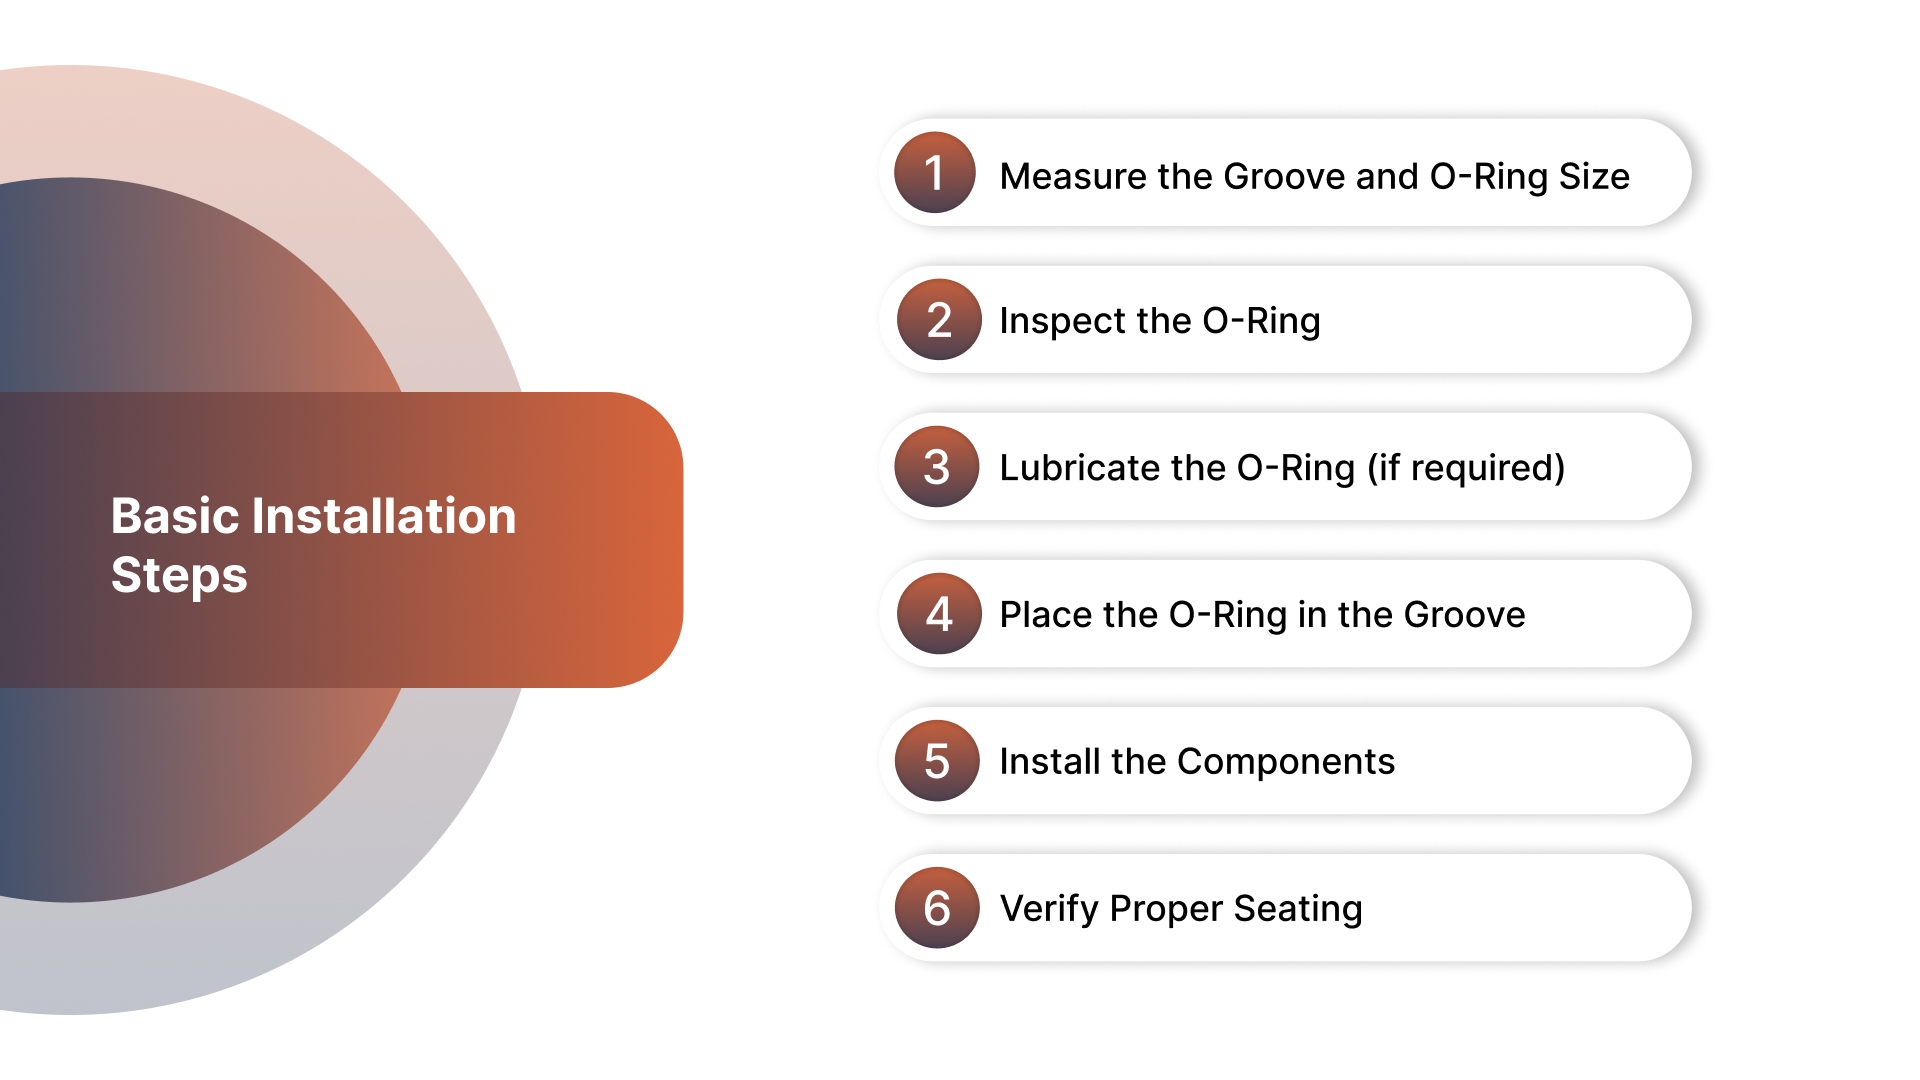
Measure the Groove and O-Ring Size
Confirm the groove dimensions and O-ring size to ensure a proper fit, referring to manufacturer specifications or a sizing chart.
Inspect the O-Ring
Examine the O-ring for any signs of damage, deformation, or contamination. Clean the O-ring if necessary to remove dust or particles.
Lubricate the O-Ring (if required)
Apply appropriate lubricant to the O-ring if it’s necessary for reducing friction during installation, especially in dynamic sealing applications.
Place the O-Ring in the Groove
Carefully position the O-ring in its designated groove, ensuring it is seated evenly around the entire circumference.
Install the Components
Gently press the components together, ensuring the O-ring stays in place without twisting or rolling.
Verify Proper Seating
After installation, double-check that the O-ring is seated properly in the groove and the sealing surfaces are aligned.
Common Installation Mistakes to Avoid
Using the Wrong Size O-Ring
An improperly sized O-ring can result in leaks, wear, and premature failure of the sealing system.
Forcing the O-Ring Into the Groove
Excessive force can stretch or damage the O-ring, leading to deformation and sealing failure.
Twisting or Pinching the O-Ring
Twisting or pinching the O-ring during installation can cause it to roll out of its groove, compromising the seal.
Neglecting Groove Cleanliness
Dirt, debris, or burrs in the groove can damage the O-ring or prevent it from sealing properly.
For applications with tight tolerances, unusual grooves, or extreme conditions (e.g., high pressure, high temperature), custom O-rings may be required. Detroit Sealing Components can assist with material selection, custom sizing, and installation guidance to ensure a perfect fit and optimal performance.
Conclusion
For engineers, OEMs, and maintenance teams, selecting the right O-ring is crucial to ensuring the longevity and efficiency of sealing systems. Properly chosen and installed O-rings prevent leaks, reduce downtime, and protect critical components from damage caused by pressure, temperature, and environmental factors.
Detroit Sealing Components provides both custom and standard O-rings tailored to precise specifications, helping teams enhance system performance, streamline installation, and maintain reliable sealing across a variety of applications.
Contact our team to find the ideal O-ring solutions for your next project and ensure optimal sealing performance.
FAQs
1. How do I measure an O-ring correctly?
To measure an O-ring, you need to determine three key dimensions: Inner Diameter (ID), Outer Diameter (OD), and Cross-Sectional Diameter (CS). Use a caliper or micrometer for precise measurements, and ensure the O-ring is clean and free from deformation before measuring.
2. What tools do I need to measure an O-ring?
Common tools for measuring O-rings include a digital caliper for accurate inner and outer diameter measurements, a micrometer for precise cross-sectional thickness, and a ruler or tape measure for rough estimates on larger O-rings.
3. Why is selecting the correct O-ring size important?
Choosing the correct O-ring size ensures a proper seal, preventing leaks and improving system efficiency. An incorrect size can lead to leakage, wear, and system failure, especially in high-pressure or dynamic applications.
4. Can I use any material for O-rings?
No, the material of the O-ring should be selected based on the operating conditions, such as temperature, pressure, and chemical exposure. Materials like NBR, FKM, and EPDM are commonly used for specific applications. Always check material compatibility for optimal performance.
5. When should I consider custom O-rings?
Custom O-rings are recommended when standard sizes or materials do not meet the unique demands of your application. If you have special size requirements, tight tolerances, or need materials that are not available in stock, custom O-rings can ensure a perfect fit and optimal sealing performance.