Introduction
The oil bath hub system is a proven wheel-end lubrication design: bearings stay cooler, wear more slowly, and oil level is easy to monitor through a sight glass. But the entire system depends on one component holding firm: the hub seal.
That seal is the only barrier between the oil-filled hub cavity and the outside world. Road grit, water, and contaminants are constantly working against it. When it fails, the consequences follow quickly — oil escapes, bearings starve or become contaminated, and you're looking at bearing seizure or worse.
49 CFR 396.5 requires every motor carrier to keep vehicles properly lubricated and free of oil and grease leaks. A weeping hub seal isn't a cosmetic issue — it's a compliance violation.
The financial stakes are just as real. Three days of unplanned downtime costs a fleet nearly $2,000 in direct revenue loss, before factoring in emergency repair bills.
Knowing those risks, this guide covers what causes hub seals to fail, how to recognize warning signs early, the correct replacement procedure, and a practical maintenance schedule to keep your wheel ends reliable.
Key Takeaways
- The hub seal, not the oil itself, is the most failure-prone component in an oil bath hub system
- Seal failure triggers a chain reaction: oil loss → bearing starvation or contamination → accelerated wear → seizure
- Key warning signs: oil weeping at the inner hub, milky oil in the sight glass, unusual heat at the wheel end after driving
- Inspect seals physically every 1–2 years — heat cycling and ozone degrade rubber even on idle equipment
- Match seal compound to your environment: NBR for general highway use, FKM for high-heat or chemically aggressive conditions
Why Oil Bath Hub Seal Maintenance Matters
The Seal's Role in the System
In an oil bath hub, the rear hub seal serves one function: keep lubricating oil inside and keep contaminants — road grit, water, fine debris — out. Remove that barrier, and the oil bath system cannot function as designed. Oil escapes, bearings lose lubrication, and the degradation begins.
That degradation follows a predictable sequence:
- Seal lip loses contact or integrity
- Oil leaks out or water forces in
- Bearings run oil-starved or on contaminated lubricant
- Bearing wear accelerates rapidly
- Bearing seizure, hub damage, or wheel-end failure follows
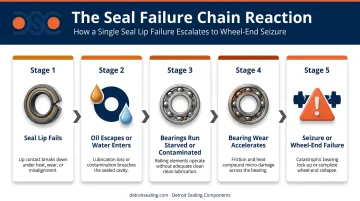
This is a safety-critical issue, not a performance nuisance. The NTSB identified bearing failure as one of the most frequent causes of truck wheel separations — and the CVSA treats an active inner wheel seal leak as a violation under federal regulations, even when brake friction material isn't yet contaminated.
Compliance and Cost Exposure
Active seal leakage puts commercial vehicles at risk of an out-of-service order. Under FMCSA Appendix A to Part 396, brake linings saturated with oil trigger an automatic inspection failure. That threshold is closer than most operators realize — a leaking seal sprays oil onto brake components as the wheel rotates.
The cost comparison makes the case for proactive maintenance:
- Seal replacement: low-cost, scheduled, preventive
- Bearing replacement: significantly higher parts and labor cost
- Hub overhaul: days of downtime, potential shop fees
- Emergency roadside service: unplanned cost, productivity loss, possible OOS order
A seal inspection program catches the low-cost item before it becomes any of the above.
What Causes Oil Bath Hub Seals to Fail
Most seal failures trace back to one of five root causes. Knowing which one you're dealing with determines whether a seal swap is sufficient — or whether something deeper needs attention first.
Road Grit and Abrasive Debris
Fine grit accumulates around the rear hub and packs against the seal lip. Over time, that grit embeds between the seal and the axle journal, acting as an abrasive that scores both surfaces. Per Meritor's TP-1374, the hub seal bore must be free of rust, dirt, scratches, and sharp edges before installation — because even a contaminated mating surface destroys a new seal's ability to hold oil. Clean the bore and inspect the journal before every installation, not just when a leak is already visible.
Water Intrusion
Repeated water exposure — boat trailer ramp submersion, river crossings, pressure washing — can force water past the seal lip. Hendrickson's maintenance manual specifically warns that pressure or steam washing can degrade lubricant performance by driving water past the seal. Lippert's trailer axle service documentation requires immediate oil replacement after any submersion event. Marine trailer applications are especially susceptible: every boat launch and retrieval cycle stresses the seal against hydrostatic pressure.
Improper Installation
SKF's wheel end maintenance guide identifies improper removal and installation as leading causes of premature seal leaks and bearing failures. The specific risks: installing the seal cocked at an angle, using a punch and hammer directly on the seal face, or catching the seal lip on spindle threads during assembly. Any of these creates an immediate leak point. Many early-life failures — seals that fail within the first few thousand miles of service — trace directly to installation errors, not material defects.
Wrong Seal Compound for the Environment
Seal rubber compounds are formulated for specific conditions, and mismatches accelerate failure. Here's how the two most common options compare:
| Property | NBR (Nitrile) | FKM (Viton®) |
|---|---|---|
| Max Heat Resistance | ~100°C (212°F) | ~200°C (392°F) |
| Ozone/Weathering Resistance | Poor | Excellent |
| Oil & Fuel Resistance | Good | Excellent |
| Typical Application | General highway use | High-heat, outdoor, or chemical exposure |
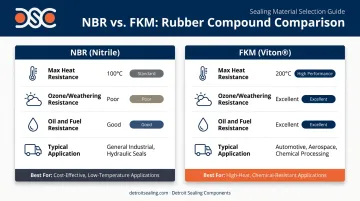
Using NBR in a high-heat hub environment causes the lip to harden and crack. In ozone-heavy outdoor storage, that degradation occurs even without mechanical stress.
Worn or Scored Axle Journal
A new seal installed on a damaged journal will fail regardless of seal quality. Hendrickson's documentation notes that worn bearing journals create more relative movement within the hub seal, shortening usable life. Dexter's HDBI manual states that deep gouges or scratches may directly cause seal failure and lubricant leakage. Before installing any new seal, inspect the axle journal surface carefully. Fine emery cloth can address minor surface oxidation, but deep scoring or out-of-round conditions require machining or axle replacement before the new seal will hold.
Warning Signs Your Oil Bath Hub Seal Needs Replacement
Visible Oil Leakage or Brake Contamination
Look for:
- Oil weeping or dripping from the inner face of the hub
- Oily residue on the inside of the wheel or tire
- Puddles forming beneath the hub after the vehicle has sat overnight
- Oil spattering on the dust shield, brake shoes, or brake drum
Minor seepage — a thin film with no active drip — may be acceptable in some applications briefly. Active dripping is not. Oil on brake friction material is an immediate out-of-service condition.
Per FMCSA Appendix A to Part 396, saturated brake linings constitute an automatic periodic inspection failure. The vehicle stays out of service until the seal is replaced and the brakes are inspected.
Sight Glass and Oil Condition Checks
The sight glass or clear hub cap shows seal condition at a glance:
| Observation | Meaning |
|---|---|
| Oil level below ADD mark | Leakage — external or internal weeping |
| Milky or foamy oil | Water contamination via seal intrusion |
| Dark, metallic-flecked oil | Bearing wear particles in the lubricant |
| Burnt smell | Bearing overheating from oil starvation |
A discolored or opaque sight glass that prevents inspection is itself a maintenance item. Replace it promptly — loss of visibility means bearing wear and oil loss go undetected until they become costly failures.
Physical and Operational Indicators
During close-up inspection, watch for:
- Cracked, hardened, or deformed seal lip
- Rust streaking radiating outward from the inner hub area
- Debris packed hard against the rear seal face
Two operational symptoms suggest bearing damage may already be underway:
- A hub too hot to hold your hand against after a normal drive points to compromised lubrication — use an infrared thermometer for a precise reading.
- A droning or rumbling noise from the wheel end means oil starvation has likely caused bearing damage. Seal replacement alone won't resolve it at that stage.
How to Replace Oil Bath Hub Seals
Preparation: Tools, Parts, and Safety
Tools and consumables needed:
- Appropriately sized seal driver or installation sleeve (matched to hub bore diameter)
- Seal puller or pry tool for extraction
- Clean rags and solvent
- Replacement seal — correct bore diameter, shaft diameter, and width
- Correct hub oil per your axle manufacturer's specification
- Torque wrench
- Vehicle safety stands
Sourcing the correct replacement seal before you begin is the most important preparation step. Confirm bore diameter, shaft diameter, seal width, and the appropriate rubber compound for your operating environment.
Safety requirements:
- Vehicle on flat, stable surface with wheels chocked
- Axle safely supported on stands — not just a jack
- Parking brake engaged
- Wheel fasteners loosened while tires are still on the ground
Hub Removal and Old Seal Extraction
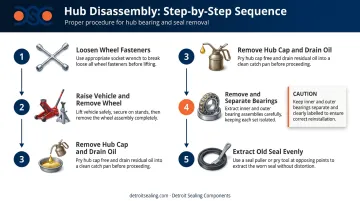
Disassembly sequence:
- Loosen wheel fasteners before lifting the vehicle
- Raise vehicle, support on stands, remove wheel
- Remove hub cap, drain remaining oil into a clean container
- Remove bearings one at a time — keep inner and outer separate and note their orientation before setting them aside
- Extract the old seal using a seal puller or appropriate lever tool, working evenly around the circumference to avoid gouging the hub bore
During disassembly, inspect:
- Axle journal surface for scoring, pitting, or corrosion
- Bearings for pitting, spalling, or discoloration from heat
- Hub bore interior for damage
Deep journal scoring, pitted bearings, or a corroded axle are escalation points. If you find any of these, stop and bring the job to a professional shop — a new seal on a damaged journal or beside failed bearings won't solve the problem.
Axle Journal Preparation and New Seal Installation
Clean the axle journal to bare metal, then use fine emery cloth to smooth any surface imperfections — always work with the circumference, not across it. Wipe clean with solvent and inspect again. Any remaining scoring will abrade the new seal lip.
Installation steps:
- Lightly coat the seal lip and the hub bore with clean hub oil
- Align the seal squarely in the hub bore — no cocking or tilting
- Drive the seal in using a proper seal driver or sleeve matched to the seal's outer diameter
- Drive it evenly to the correct depth, confirming equal depth around the full circumference
- Never use a punch and hammer directly on the seal face — this deforms the seal and creates immediate leak points
When selecting the replacement seal, match compound to environment. DSC (Detroit Sealing Components) stocks hub seals across a wide range of dimensions and compounds — NBR for standard highway duty, FKM for high-heat, high-load, or chemically aggressive environments. Their ISO 17025 accredited lab validates material selection for specific operating conditions, particularly relevant for marine or heavy agricultural applications.
Reassembly, Oil Fill, and First Inspection
Reassembly steps:
- Reinstall bearings in their original orientation
- Refit the hub onto the spindle
- Fill with manufacturer-specified oil to the correct level — use the sight glass FULL mark as your reference, not guesswork
- Reinstall hub cap and torque to specification (Hendrickson specifies 15 ±3 ft-lbs for hubcap screws; consult your specific OEM manual)
- Torque all wheel fasteners to specification in a star pattern
Post-replacement check is non-negotiable. Inspect for leaks after the first 50–100 miles before returning to full service loads. Any sign of weeping at the inner hub means the seal was likely installed incorrectly. Pull it and redo the installation — don't convince yourself it will seat on its own.
Oil Bath Hub Seal Maintenance Schedule
Maintenance frequency isn't universal. Equipment operating in high-grit environments, off-road conditions, or marine applications needs more aggressive inspection intervals than standard highway fleets. Load weight and duty cycle also affect seal wear rates.
| Maintenance Task | Standard Highway Equipment | Trailer / Marine / Harsh Environments |
|---|---|---|
| Visual sight glass check (oil level and clarity) | Weekly | Before every trip |
| Hub exterior cleaning to remove grit buildup | Monthly | After any off-road or water exposure |
| Full seal inspection (hub removal required) | Every 12 months / 100,000 miles | Annually, or every 12,000 miles (Lippert 8K–16K spec) |
| Complete seal replacement with oil change | At any failed inspection, or per OEM interval | At any failed inspection; immediately after submersion |
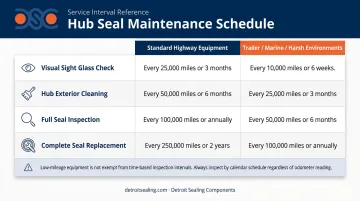
Low-mileage equipment is no exception: don't skip the annual inspection just because the trailer "barely moved." Ozone, heat cycling, and oxygen exposure degrade elastomers regardless of mechanical use.
Trelleborg's materials data shows NBR has a recommended storage life of 7 years even in controlled conditions. An aged seal in active field service degrades faster than that baseline suggests.
OEM-specified intervals vary by axle manufacturer:
- Meritor MM-0409: Wheel-end inspection at routine PM or 12 months/100,000 miles
- Lippert 8K–16K: Annual inspection or every 12,000 miles
- Hendrickson L496: Monthly visual checks of hub back and hubcap gasket; smooth-rotation and end-play checks every 3–4 months
Follow the interval your axle OEM specifies. When operating in harsh conditions, apply the most conservative interval that applies.
Frequently Asked Questions
Is a hub oil seal leak serious?
Yes. A leaking hub oil seal causes oil loss, bearing starvation, and accelerated bearing wear. In severe cases it leads to brake contamination or wheel-end seizure — both serious safety hazards. Active leakage on a commercial vehicle is a federal regulatory violation under 49 CFR 396.5 requiring immediate attention.
What are the symptoms of a bad hub seal?
Watch for these warning signs:
- Oil weeping or dripping from the inner hub area
- Milky or low oil visible through the sight glass
- Rust streaking around the hub face
- Unusual heat at the wheel end after a normal drive
- Grinding or rumbling bearing noise — damage may already be underway
What kind of oil should be used in oil bath hubs?
The correct oil type and viscosity is specified by your axle or hub manufacturer. Common specifications include SAE 75W-90, SAE 80W-90, and SAE 90 gear oil, depending on the application. Dexter, Hendrickson, Lippert, and Meritor each have their own approved lubricant lists — consult your specific OEM manual rather than defaulting to a generic recommendation.
Should you put grease in oil bath hubs?
No. Oil bath hubs require liquid oil lubrication — grease interferes with oil flow around the bearings, damages the seals, and eliminates the thermal management advantages these systems are built around. Never mix grease and oil in the same hub assembly.
How often should oil bath hub seals be replaced?
Seals should be physically inspected at every major wheel-end service and at minimum every 1–2 years. Replacement is required whenever inspection reveals cracking, hardening, deformation, scoring, or any sign of active leakage — and proactively per your axle manufacturer's recommended interval. Low-mileage equipment is not exempt from time-based inspection.
What causes oil bath hub seals to fail prematurely?
Premature failure typically traces back to one of these root causes:
- Road grit abrasion against the seal lip
- Water intrusion from submersion or repeated wet exposure
- Improper installation, especially cocked or uneven seating
- Wrong rubber compound for the operating temperature or chemical environment
- A worn or scored axle journal that abrades the new seal immediately