Small installation details can significantly impact equipment reliability. When grommets are improperly installed, cables and hoses may still experience abrasion, vibration damage, or premature wear, even if the correct grommet type is selected.
For industrial, automotive, and electrical applications, proper installation is essential to ensure protection, durability, and long-term performance. Grommets are designed to protect components passing through panels, but they only perform as intended when installed correctly.
This guide explains how to install grommets step by step, including preparation, installation methods, common mistakes to avoid, and best practices for industrial applications.
Key Takeaways
Proper grommet installation is essential to prevent abrasion, vibration damage, and premature wear of cables and hoses.
Accurate measurement of panel hole size, panel thickness, and component diameter is critical for correct grommet fit.
Installation methods vary by grommet type, material, and application requirements.
Common installation errors, such as forcing the grommet or ignoring panel preparation, can compromise performance.
Standard grommets suit many applications, but demanding environments may require custom designs for reliable long-term performance.
What Is a Grommet and Why Installation Matters
A grommet is a ring-shaped component installed into a panel or enclosure opening to protect cables, wires, hoses, or tubing as they pass through. By covering sharp edges and providing a cushioned interface, grommets help prevent abrasion, insulation damage, and wear caused by vibration or repeated movement.
Although grommets are small components, their role in equipment reliability is significant. This importance is reflected in broader industry demand.
The global grommets market was valued at approximately USD 3.8 billion in 2023 and is projected to reach around USD 5.6 billion by 2032, primarily driven by the automotive, electronics, and industrial sectors, where cable protection and mechanical reliability are critical to safety and uptime.
While grommet selection is important, installation plays an equally critical role. A properly installed grommet:
Stays securely seated in the panel
Maintains consistent contact with the passing component
Reduces vibration-induced movement
Prevents cutting, abrasion, or insulation damage
Incorrect installation can compromise these benefits, leading to loose fits, torn grommets, or exposed edges.
Tools and Preparation Before Installing Grommets
Proper preparation helps ensure grommets seat correctly and perform as intended. Taking a few steps to verify dimensions, clean the panel opening, and gather basic tools reduces the risk of tearing, poor retention, or premature wear during installation.
Basic Tools and Supplies
Measuring tools (calipers or gauges): Used to confirm panel hole diameter, panel thickness, and component size.
Deburring tool or file: Removes sharp edges or burrs that could damage the grommet during installation.
Clean cloth or compressed air: Clears debris, metal shavings, or contaminants from the panel opening.
Light lubricant (optional): Can ease installation for stiffer grommet materials, provided it is compatible with the application.
Panel Preparation Checklist
Confirm the panel hole is round and within tolerance
Remove burrs, sharp edges, and surface irregularities
Clean the opening to ensure proper seating
Verify the grommet matches the panel thickness and application requirements.
Proper preparation supports consistent installation and helps the grommet maintain secure, long-term protection once in service.
For demanding applications, Detroit Sealing Components offers industrial-grade rubber grommets and molded components built to support consistent performance and long-term reliability.
How to Install Grommets: Step-by-Step Instructions
While installation details may vary by grommet design and material, the process below applies to most standard rubber and plastic grommets used in panels, enclosures, sheet metal, and equipment housings. Taking time to install the grommet correctly ensures proper sealing, cable protection, and long-term stability, especially in environments with vibration, movement, or temperature changes.
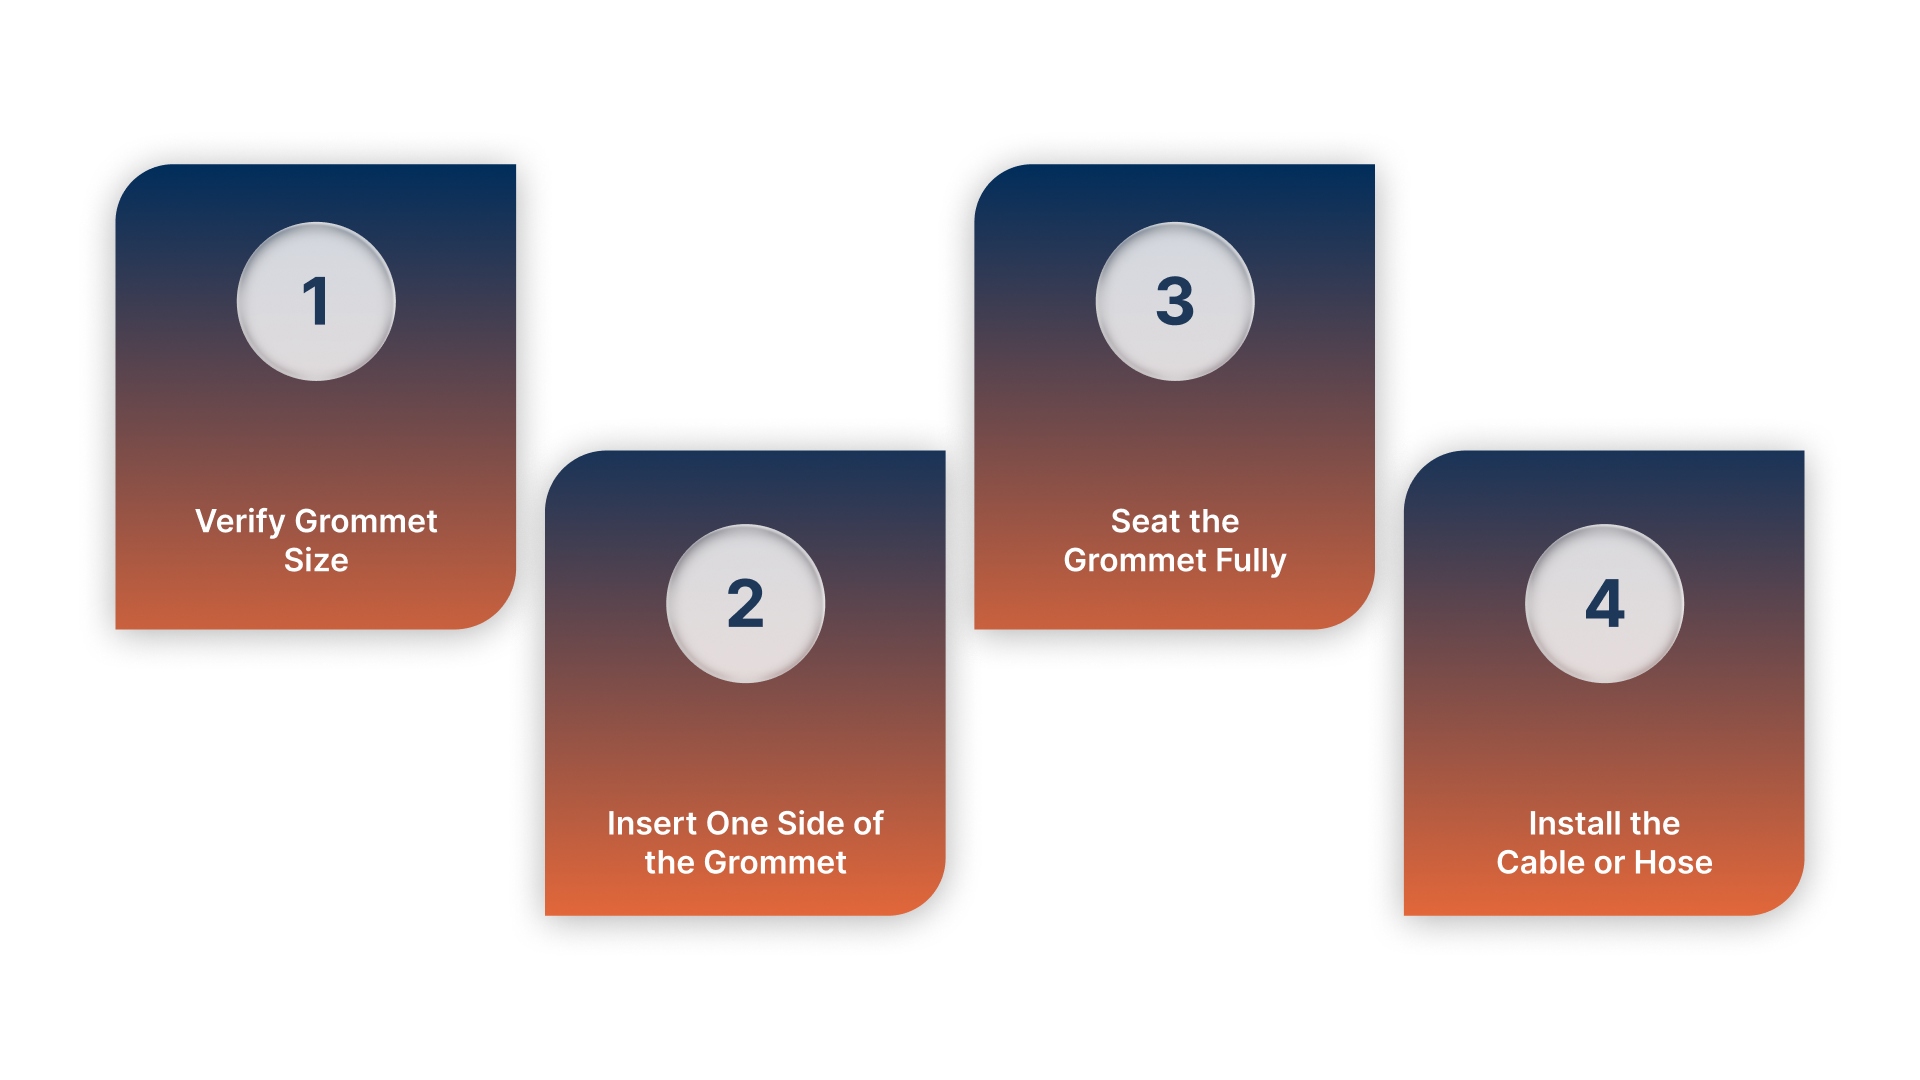
Step 1: Verify Grommet Size (Confirm Fit Before Installation)
Before installation begins, make sure the grommet is properly matched to the panel and the component passing through it. Correct sizing is essential, an undersized grommet can tear or deform during installation, while an oversized one may not seat securely or stay in place during operation.
Check the following measurements:
Panel hole diameter: The groove diameter must match the cutout so the grommet locks firmly without stretching.
Panel thickness/groove depth compatibility: The groove should capture the panel edge fully, with no looseness or compression.
Cable, wire, or hose diameter: The inner opening should provide a snug protective grip without pinching or restricting movement.
If any dimension does not align, replace the grommet with the correct size before proceeding, installation success depends on it.
Step 2: Insert One Side of the Grommet (Start the Seating Process)
Begin by positioning the grommet over the panel opening and pressing one side of the groove into the edge of the hole. This creates an initial anchor point and keeps the grommet stable as the rest of the material is worked into place.
While seating the first section:
Align the grommet squarely with the opening to avoid twisting or distortion
Apply steady, even pressure rather than forcing the part into the hole
Allow the material to flex naturally instead of stretching it across the edge
This controlled start helps ensure the groove tracks correctly around the panel as installation continues.
Step 3: Seat the Grommet Fully (Secure the Groove Around the Edge)
Once the first section is set, work your way around the panel hole, pressing the remaining portion of the groove into position. Continue until the grommet snaps securely over the full circumference of the panel edge and sits flush on both sides.
During this step, verify that:
The flange rests flat on the panel surface without lifting or curling
The grommet is evenly seated all the way around, with no gaps or uneven edges
The material is not twisted, stretched, or distorted during installation
If the grommet material is rigid or temperature-stiff, a small amount of approved lubricant may be used to assist with seating.
Step 4: Install the Cable or Hose (Verify Alignment and Protection)
After the grommet is fully seated and secure, route the cable, wire, or hose through the center opening. This is the final check to ensure that both the component and the grommet are properly aligned and functioning as intended.
Confirm that:
The cable passes smoothly through the opening without binding or abrasion
It is centered within the grommet and not touching the raw panel edge
The grommet remains locked in place after installation, even under slight movement
Correct alignment ensures the grommet provides continuous edge protection, reduces vibration wear, and helps maintain equipment reliability.
Installing Different Types of Grommets
Grommet installation methods vary depending on design, material, and application requirements. While the general installation process is similar, certain grommet types require additional care to ensure proper seating, retention, and long-term performance.
Understanding these differences helps prevent damage and ensures the grommet functions as intended.
Grommet Type | Installation Notes | Common Applications |
Open Grommets | Press evenly into the panel until the groove seats fully around the edge. | General cable and hose pass-through protection |
Split Grommets | Wrap around existing cables, then press into the panel opening. | Retrofits and maintenance installations |
Blind Grommets | Insert until flush on both sides to seal unused holes. | Blocking dust, debris, or moisture |
Strain Relief Grommets | Align to support cable bend and reduce pulling stress. | Electrical and vibrating systems |
Snap-In / Push-In Grommets | Apply firm pressure until the grommet snaps securely into place. | High-volume or quick assembly |
Screw-In / Specialty Grommets | Install using tools per design requirements. | High-retention or specialized environments |
Following the correct installation approach for each grommet type helps maintain consistent performance and reduces the risk of premature wear.
Installations with unique design or performance requirements may require custom-fit grommets, where Detroit Sealing Components can assist with material selection and installation considerations.
Installation Errors That Can Affect Grommet Performance
Even when the correct grommet is selected, installation errors can reduce its effectiveness and lead to premature wear or failure. Avoiding these common mistakes helps ensure consistent protection and reliable performance.
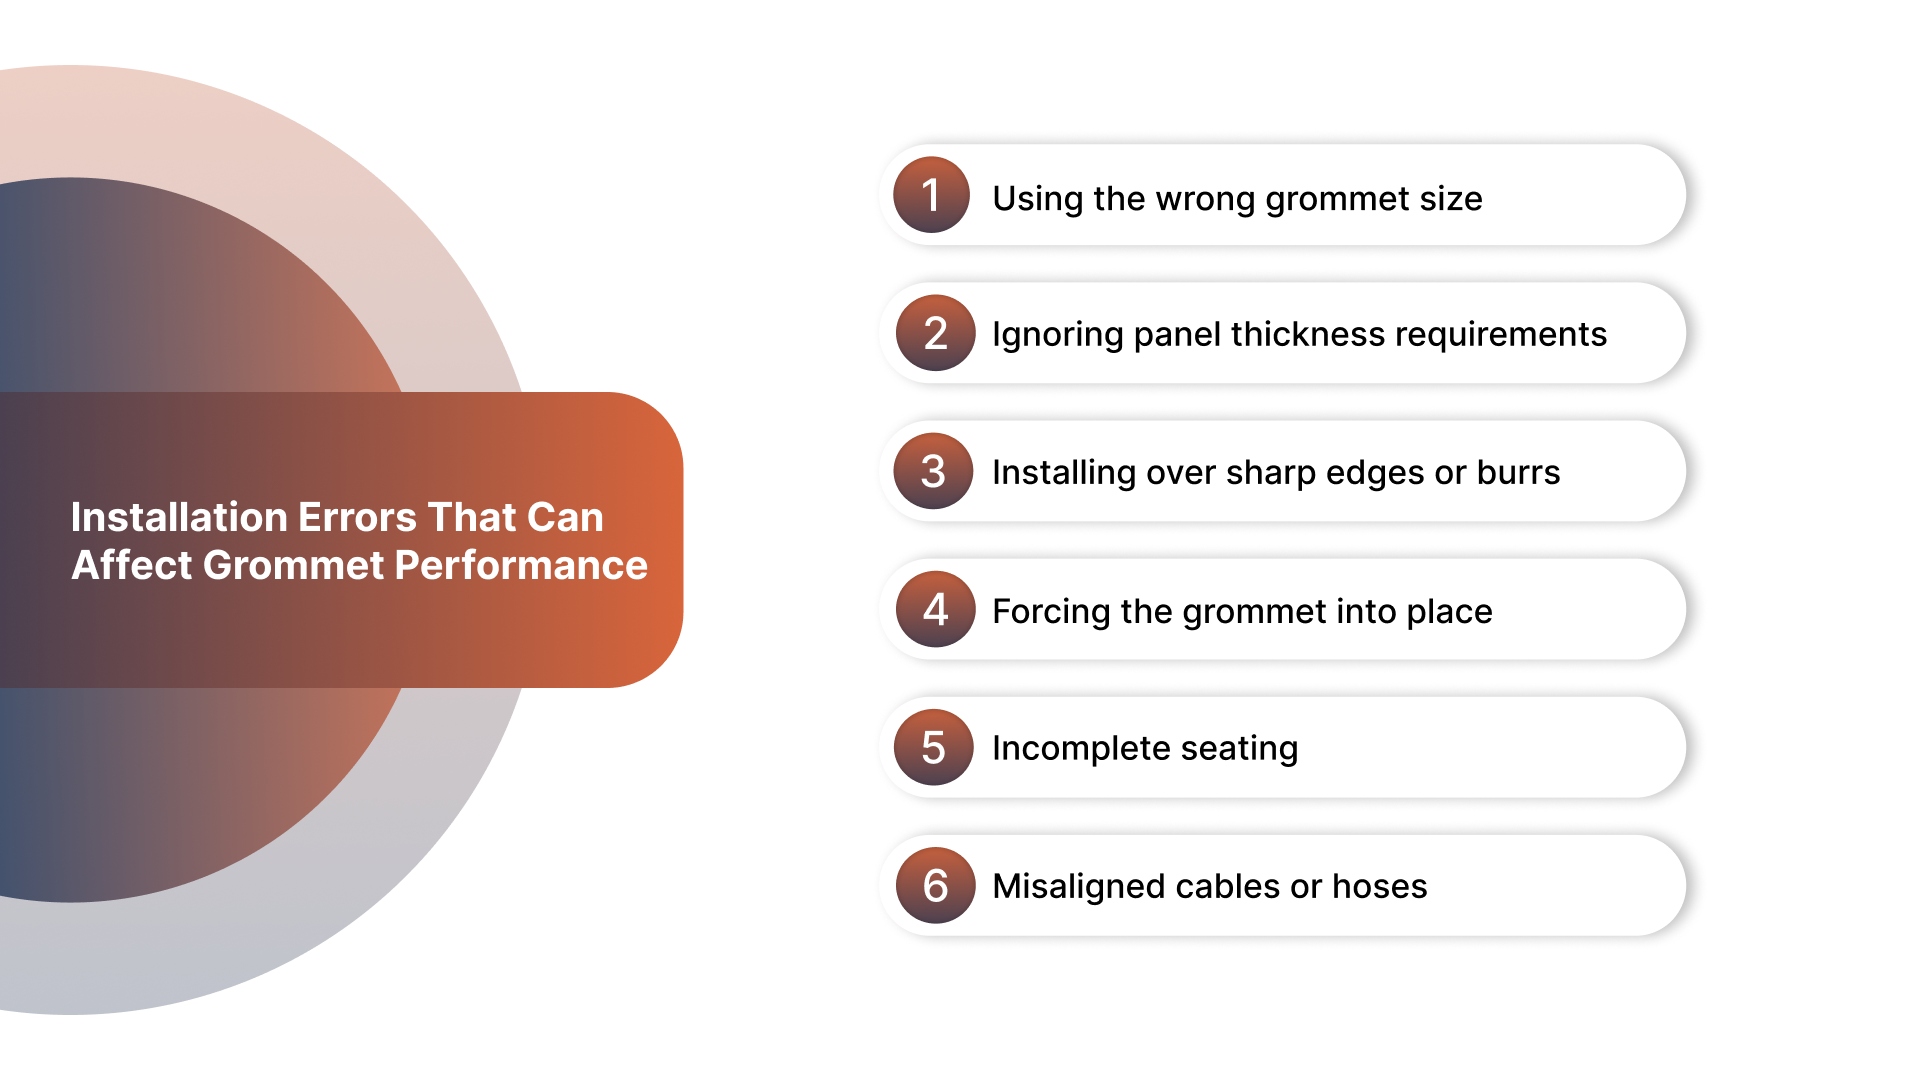
Using the wrong grommet size: An undersized or oversized grommet can result in poor retention, tearing, or exposed panel edges.
Ignoring panel thickness requirements: Grommets designed for specific panel thickness ranges may not seat properly if the thickness is overlooked.
Installing over sharp edges or burrs: Sharp panel edges can cut or damage the grommet during installation or over time.
Forcing the grommet into place: Excessive force can deform or tear the grommet, compromising its ability to stay seated.
Incomplete seating: A grommet that is not fully seated around the panel edge may shift or pop out during use.
Misaligned cables or hoses: Poor alignment can place unnecessary stress on the grommet and reduce its service life.
Addressing these issues during installation helps prevent rework, reduce maintenance needs, and extend the life of both the grommet and the components it protects.
When to Consider Custom Grommets
Standard grommets work well for many applications, but some installations require designs tailored to specific dimensional, material, or performance requirements. Custom grommets help ensure proper fit, retention, and long-term reliability when standard options are not sufficient.
Custom grommets may be appropriate when:
Panel thickness or hole sizes fall outside standard ranges
Panel geometries are non-round or irregular
Exposure to oils, chemicals, or extreme temperatures is present
High vibration or mechanical movement is expected
Tight tolerances or precise fit requirements are critical
Material certifications or compliance requirements apply
Custom designs allow for optimized material selection, improved installation fit, and more consistent performance in demanding environments.
Conclusion
Proper grommet installation plays an important role in protecting cables, hoses, and panels from wear, vibration, and premature failure. Accurate sizing, careful preparation, and the right installation method help ensure grommets perform as intended over time.
For applications with higher performance demands or non-standard requirements, selecting the right grommet design and material is just as important as correct installation.
Detroit Sealing Components delivers custom designed to exact specifications, helping teams reduce downtime, simplify installation, and maintain long-term reliability across vehicle systems. Connect with our team.
FAQs
1. How do I install a grommet properly?
To install a grommet properly, verify the correct size, deburr and clean the panel hole, press the grommet evenly into the opening, and ensure it is fully seated before routing the cable or hose.
2. Do I need special tools to install grommets?
Most grommets can be installed by hand. Measuring tools and deburring tools are recommended to ensure proper fit and to prevent damage during installation.
3. Why does a grommet come loose after installation?
A grommet may come loose due to incorrect sizing, incompatible panel thickness, incomplete seating, or excessive vibration during operation.
4. Can grommets be installed on existing cables?
Yes, split grommets are designed to be installed around existing cables or hoses without requiring disassembly.
5. When should I use a custom grommet instead of a standard one?
Custom grommets are recommended for non-standard hole sizes, unusual panel designs, harsh environmental exposure, or applications requiring tighter tolerances and specific material performa